
Written by Tobias Gundry
If you run popular classes that fill up fast, you know the drill — spots are gone in seconds and your most loyal members miss out. Priority Booking gives your best clients a head start by reserving a booking window just for them before the class opens up to everyone else.
You choose which clients get priority, how long the window lasts, and which schedules it applies to. It’s a great way to reward loyalty and keep your regulars coming back.
How it works
When a class opening is created for a schedule with priority booking enabled, a priority window kicks in. During that window, only clients on your priority list can book. Once the window expires, the class opens up to all clients as normal.
The priority window starts when the opening is created — so if you’ve set up a class release time, the window begins at that release time rather than in the middle of the night. We’d recommend pairing priority booking with a class release time so your priority clients get the most out of their head start.
Who gets priority?
You have three ways to define your priority list, and you can mix and match:
- Individual clients — hand-pick specific clients who should get early access
- Membership plans — any client with an active membership on a selected plan gets priority
- Client tags — any client with a selected tag gets priority
A client only needs to match one of these to be on the priority list. For example, if you select a “VIP” tag and an “Unlimited” membership plan, any client who has either the tag or an active membership on that plan will get priority access.
Setting up Priority Booking
Priority booking is configured per schedule, so you can offer it on your high-demand classes without affecting the rest.
When creating a new schedule
1. In Clovo Studio, go to Setup > Schedule.
2. Click Add schedule.
3. Fill in the class, day, time, and other details as usual.
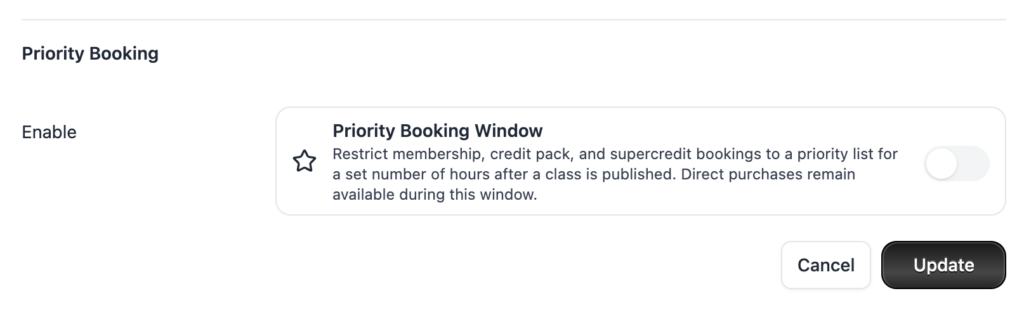
4. In the Priority Booking section, toggle Enable Priority Booking on.
5. Set the Priority window (hours) — this is how long the priority-only period lasts, from 1 to 168 hours (7 days).
6. Select your priority Clients, Plans, and/or Tags.
7. Save the schedule.
On an existing schedule
1. Go to Setup > Schedule and click on the schedule you’d like to update.
2. Click Edit.
3. Toggle Enable Priority Booking on and configure the window and priority list.
4. Save your changes.
Changes to the priority list or window duration only apply to future openings. Any classes that have already been opened keep their original priority window timing.
What your clients see
During the priority window, clients who aren’t on the priority list won’t be able to book the class. They’ll see that the class is in a priority booking window and when the window ends, so they know exactly when they can jump in.
Once the window expires, the class opens up and anyone can book as normal — first in, best dressed.
Pairing with Class Release Time
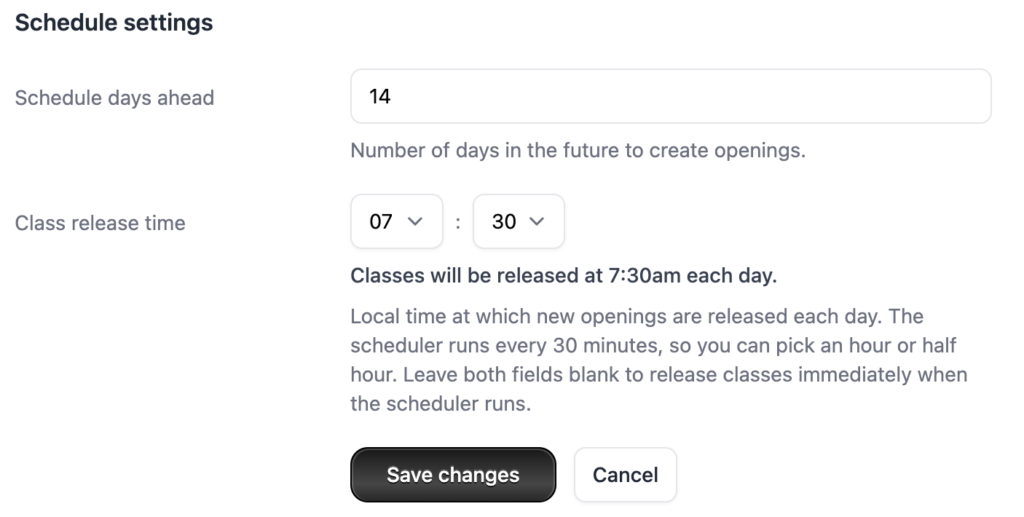
Priority booking works best when paired with a class release time. Without a release time, openings are created whenever our scheduler runs (every 30 minutes), which could be at any hour. The priority window starts from that moment, which might mean it’s ticking away overnight when nobody’s booking.
By setting a release time (e.g. 7:00am), you ensure the priority window starts when your clients are actually online and ready to book.
To set a class release time, head to Setup > Account and scroll to the Schedule settings section.
FAQs
Can I have different priority windows for different classes?
Yes. Priority booking is set per schedule, so you can have a 24-hour window on your Saturday morning Pilates and a 4-hour window on your Tuesday evening class — or no priority booking at all on others.
What happens if I don’t select any priority clients, plans, or tags?
If you enable priority booking but don’t add anyone to the priority list, nobody will be able to book during the window. Make sure you’ve selected at least some clients, plans, or tags.
Do one-off purchases bypass the priority window?
Yes. If a client is purchasing a class directly (a one-off payment rather than using a membership or credit pack), the priority window is bypassed. This means you won’t miss out on revenue from walk-in or casual clients during the priority period.
Can staff still book clients during the priority window?
Yes. When you book a client into a class from the dashboard, the priority window is bypassed. This gives you the flexibility to manage bookings manually when needed.
I edited my schedule’s priority settings — why didn’t existing classes change?
By design, existing openings keep their original priority window. This avoids changing the rules on clients who may have already seen or planned around the original timing. Your changes will apply to all future openings generated from that schedule.
Does priority booking work with waitlists?
Yes. Priority booking and waitlists are independent features that can both be active on the same class. The priority window controls who can book during the initial window, while the waitlist manages what happens when a class is full.
-
Location in Clovo
-
Estimated Time To Complete
15 -
Information For
Studio Owner -
Platform Components
Clova Studio, Clova iOS, Clova Android -
Last Updated
April 22, 2026 -
Need more help?
Get in touch hello@clovo.au