
Customise your dashboard layout

Tobias Gundry
Updated
The dashboard is the first screen you see, and what belongs at the top of it depends on your job. A front desk lead wants expiring packs and today's activity. An owner wants revenue and renewals. Rather than compromise, you can arrange your own.
Everything on this screen is set through one control: Configure, above the cards on the right.
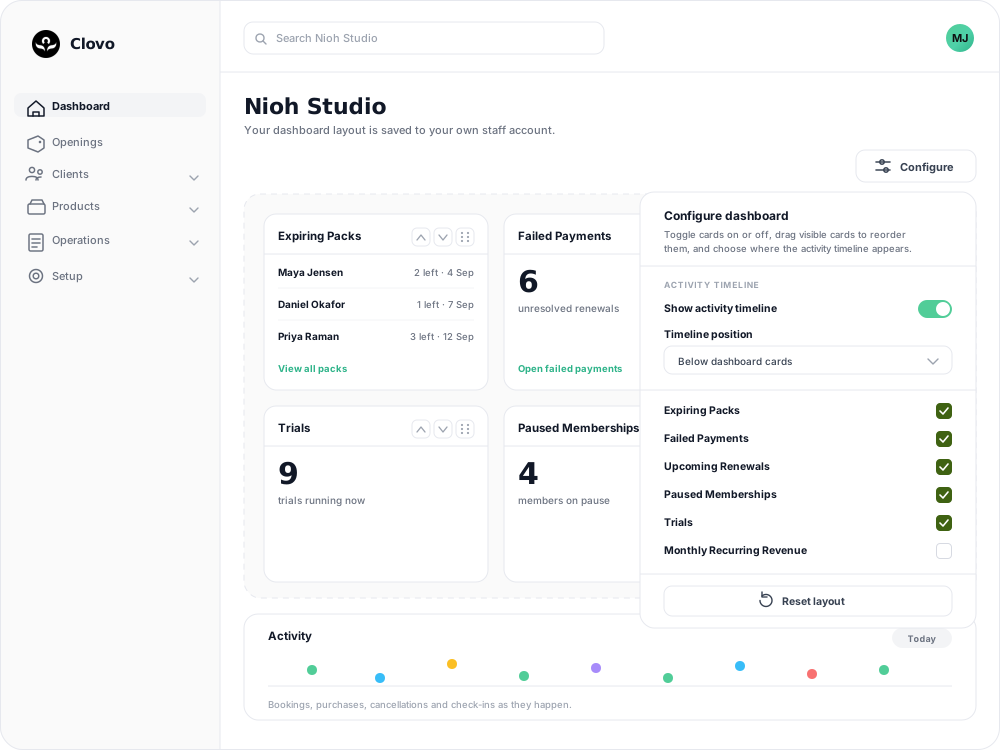
Your layout is yours alone
This is the part worth knowing before anything else: the layout is saved to your own staff account, not to the studio.
Nothing you turn off here disappears for anyone else, and nothing a colleague turns on appears for you. If a card is missing for a colleague, ask them to open Configure while signed in to their own account. Dashboard layout is not a studio-wide setting.
Changes save as you make them. There is no Save button and nothing to confirm.
Choose which cards you see
Select Configure, then tick or untick each card in the list.
Choose the cards you use regularly, including day-to-day tasks and reports.
The list only offers cards your role can see, so it can be shorter for some staff than others. The Upcoming Renewals and Failed Payments cards require Finance or Owner access. Staff or Setup alone does not make these cards available. A card that is missing from your list is usually controlled by staff permissions rather than your layout.
Put the cards in order
Every visible card has three controls in its header:

- The up arrow moves the card one place earlier.
- The down arrow moves it one place later.
- The grip handle drags the card to wherever you want it.
The arrows are the reliable option on a touchpad, and the only option if dragging is awkward for you. Both do the same thing, and both save straight away.
Move or hide the activity timeline
The activity timeline is off by default. Turn it on to see bookings, purchases, cancellations and check-ins as they happen. Two settings at the top of the Configure panel control it:
- Show activity timeline hides it entirely when switched off.
- Timeline position puts it Above dashboard cards or Below dashboard cards.
With the timeline switched off, the position selector is unavailable. Switch the timeline back on and it becomes available again.
If you spend your day watching activity, put it above. If you open the dashboard for numbers first, put it below or turn it off.
Start again
Reset layout, at the bottom of the Configure panel, puts every card back to its default visibility and order, and switches the activity timeline off, with its position set below the cards. It only resets your own layout.
Use Reset layout when you want to restore the default card visibility and order, or when your current arrangement no longer works for you.
Common questions
A colleague and I are looking at different dashboards. Is something wrong? No. Each staff account keeps its own layout, so two people on the same studio will see different cards in a different order if they have arranged them differently.
I hid a card and now I cannot find it. Open Configure and look for it in the list — hidden cards stay there with their checkbox cleared. If it is not in the list at all, your role does not have access to it.
Do I have to save? No. Each change is saved as you make it.
Will my layout follow me to another device? Yes. Sign in with the same staff account to use your layout on another device.
A card is on but shows nothing. An empty card can mean there is currently nothing to show. For example, Expiring Packs is empty when no pack is close to expiring, and Failed Payments is empty when there are no unresolved renewals.
Related articles
Change the reply to address for your studio
Choose where client replies go for announcements, bookings, purchases and other studio emails.
Understand the meaning of different plan statuses in Clovo
Use the status beside a client’s membership, credit pack or trial to understand whether they can use it and when their access changes.
Change the address shown on invoices
Choose your business address or a studio location as the From address on new client invoices and receipts.
Read your Studio Health Check
A scored, printable report that reviews your studio's setup, revenue, retention, growth and engagement, and links straight to the screen that fixes each finding.