
Add a Meta pixel and Google tags to your landing pages

Tobias Gundry
Updated
You can connect a Meta pixel, a Google tag, or both to your studio’s Clovo landing pages. These connections help you measure public page visits, campaign referrals and completed actions, such as registrations and purchases, after a visitor accepts optional cookies.
These settings apply only to Clovo landing pages and actions completed through them. They do not extend to tracking on devices or activity inside the Clovo iOS or Android apps, the studio dashboard, or your own website. Someone opening your landing page in a phone’s browser is using the landing page; someone booking inside the Clovo app is not.
Tracking requires a published studio privacy policy and the visitor’s consent. Entering an ID alone does not start tracking.
Before you begin
Have the details for the accounts you want to connect ready:
| Connection | What you need | Where it goes in Clovo |
|---|---|---|
| Meta | Your numeric pixel ID from Meta Events Manager | Meta pixel ID |
| Google Analytics or Google Ads | A Google tag ID beginning with G-, GT- or AW- |
Google tag ID |
| Direct Google Ads registration conversions, if wanted | The registration conversion destination in the form AW-123456789/label |
Registration Ads conversion |
| Direct Google Ads purchase conversions, if wanted | The purchase conversion destination in the form AW-123456789/label |
Purchase Ads conversion |
Use the IDs belonging to your studio’s intended reporting accounts. The values shown in this guide are examples; replace them with your own.
In your provider accounts, disable automatic event detection, advanced matching, enhanced conversions and enhanced measurement where those features apply. These are the provider settings called out in Clovo’s Consent and privacy notice. Keep personal and sensitive information out of campaign names.
You will also need to review the studio privacy policy before publishing it. Clovo provides a starting draft, which you should adapt to how your studio handles information.
Open the landing page settings
- In Clovo Dashboard, go to Setup → Landing page.
- Check that Published is on if you want clients to access your landing page.
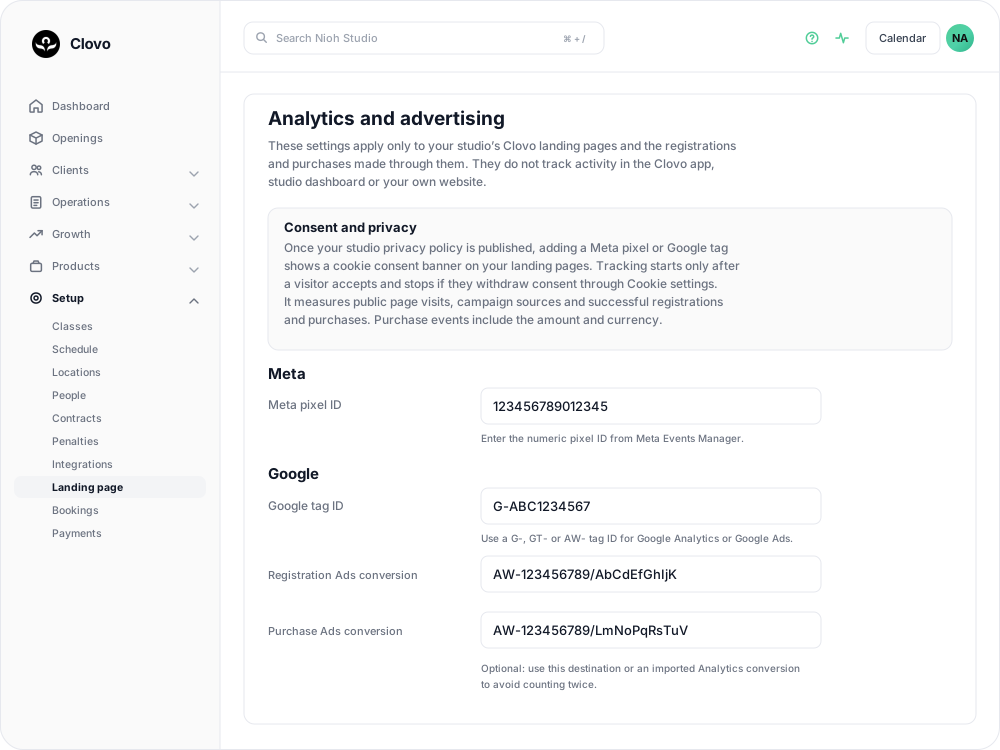
- Scroll to Analytics and advertising.
The Meta and Google sections are separate. You can use either provider on its own or configure both.
If you have not set up the page itself, see enable browser based bookings and payments with landing pages. Your landing page subdomain determines the address you will use to check the connection.
Add your Meta pixel
- Copy the numeric pixel ID from Meta Events Manager.
- Paste it into Meta pixel ID under Meta.
- Check that the field contains only the ID, without a script, a URL or any surrounding text.
Clovo accepts a Meta pixel ID containing 5 to 32 digits. For example, the shape of a valid entry is 123456789012345.

You do not need to paste Meta’s installation code into Clovo. Leave this field blank if you do not want to use Meta tracking.
After you finish the privacy policy steps below and save, the pixel can measure eligible landing page activity for visitors who accept optional cookies.
Add your Google tag
- Copy the Google tag ID for the Google Analytics or Google Ads setup you want to use.
- Paste it into Google tag ID under Google, keeping the prefix and hyphen.
- Check that you have entered a tag ID, rather than a Google Tag Manager container or installation script.
The supported prefixes are G-, GT- and AW-. A Google Tag Manager container beginning with GTM- is not supported in this field. Pasted scripts are not supported either.

Leave Google tag ID blank if you do not want to use Google tracking. You can use a Google tag without filling in the optional Ads conversion fields.
Set up direct Google Ads conversions, if needed
The two Ads conversion fields let you send completed registrations and purchases to specific Google Ads conversion actions.
- Find the destination in the Google Ads conversion event snippet for the action you want to measure.
- Copy the full destination, including the
AW-ID, slash and conversion label. Its format isAW-123456789/label. - Put the registration destination in Registration Ads conversion and the purchase destination in Purchase Ads conversion. Fill in only the actions you want to use.
- Make sure Google tag ID is also filled in. Clovo requires a Google tag before you can save Ads conversion destinations.

The conversion label belongs to a specific action. Copy each action’s destination rather than using the registration destination for both fields. Do not paste the entire event snippet or enter only the AW- ID in an Ads conversion field.
Choose one reporting route for each action: use the direct Ads destination in Clovo or an imported Analytics conversion for that same action. Using both can count the same registration or purchase twice.
Leaving an Ads conversion field blank disables that direct Ads destination; it does not turn off the Google tag. There is no separate trial Ads conversion field on this screen.
Review and publish your studio privacy policy
Scroll to Studio privacy policy on the same settings page. This policy appears on your studio’s landing pages and is separate from Clovo’s own privacy policy.
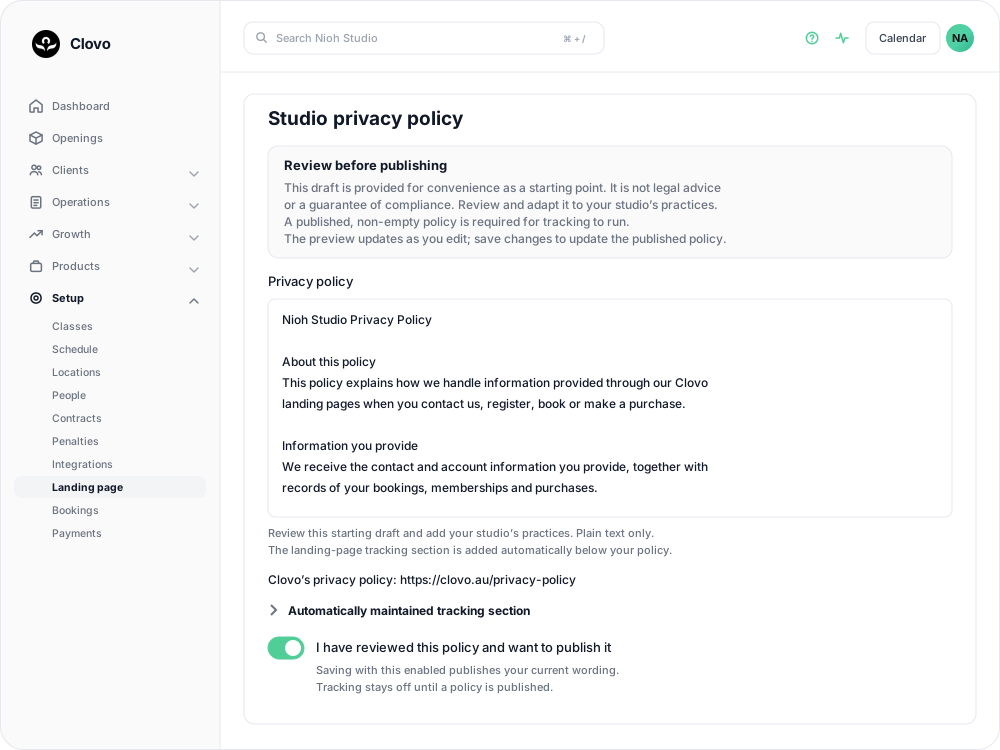
- Read the Privacy policy text. When you do not already have a saved policy, Clovo provides a starting draft using your studio’s details.
- Edit the draft to reflect your studio’s practices. Include how you retain information, other service providers you use, overseas disclosures, and how people can make privacy requests. Check the contact details too.
- Use plain text in this field.
- Expand Automatically maintained tracking section to review the landing page tracking wording that Clovo adds below your policy. Its preview changes as you edit the Meta and Google settings.
- When your wording is ready, turn on I have reviewed this policy and want to publish it.
- Return to the top of the settings page and select Save changes.
The starting draft needs your review; publishing it is a decision about your studio’s own wording. You do not need to copy the automatically maintained tracking section into the text field.

Published near the top of the page controls whether the landing page is available. I have reviewed this policy and want to publish it controls whether the privacy policy is published. These are separate controls, and an available landing page does not by itself enable tracking.
Once both the landing page and policy are published, View published policy lets you open the public policy. Check that it contains your saved studio wording and the tracking section for the providers you selected. Editing the preview alone does not update the public policy—you must save.
What visitors see
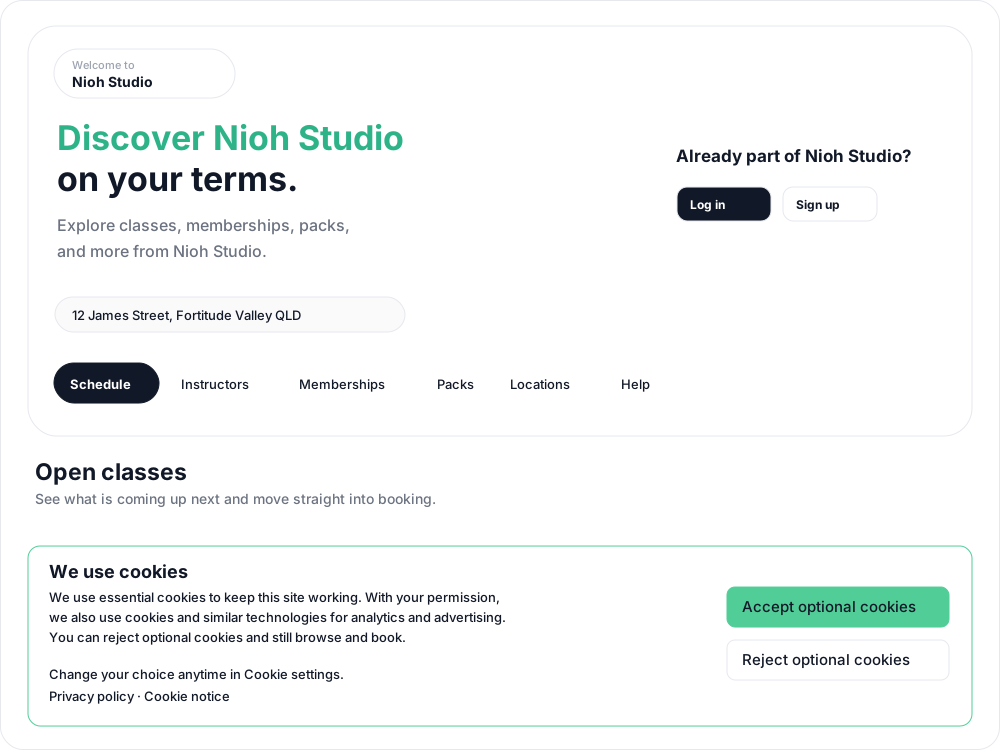
With a provider ID saved and a studio privacy policy published, your landing pages display a We use cookies banner when a visitor needs to make a choice.
Visitors can choose:
- Accept optional cookies to allow analytics and advertising measurement for the configured providers.
- Reject optional cookies to keep optional tracking off. They can still browse and book.
The banner links to the Privacy policy and Cookie notice. Visitors can reopen their choice through Cookie settings at the bottom of the landing page.
A choice is remembered in that browser for up to 180 days. Visitors may be asked again after you change the policy wording, provider IDs or Ads conversion destinations. A different browser or cleared browser data can also mean they see the banner again.
If a visitor withdraws consent through Cookie settings, future tracking stops and local measurement data is cleared. This does not recall information already sent to the providers.
Understand what is measured
These measurements depend on consent. Use the event names below to recognise the activity in the provider account you connected; they are not extra fields you need to configure in Clovo.
| Landing page activity | Meta event | Google event |
|---|---|---|
| Eligible public page visit while signed out | PageView |
page_view |
| Completed account registration | CompleteRegistration |
sign_up |
| Successfully started free trial | StartTrial |
start_trial |
| Confirmed successful purchase | Purchase |
purchase |
Public page visits cover the main landing page, memberships, packs, locations and instructors. This is not a record of every screen a client opens: signed-in browsing and pages outside that list do not generate these public page-view measurements.
A click on a purchase button is not a completed purchase. Purchase measurement depends on a successful payment and includes the amount and currency. A free trial start is a separate action from a paid purchase. Class bookings are not listed as a separate conversion in this integration.
The integration does not send names, email addresses, form contents or card details. Purchase reporting uses a generic Studio purchase item rather than a detailed product breakdown. The automatically maintained policy section explains the information the providers may receive and how visitor choices work.
Campaign referrals
You can use campaign parameters on links to your landing page to distinguish traffic sources. For example, your link could use this pattern, with your own studio address:
https://yourstudio.clovo.app/?utm_source=instagram&utm_medium=social&utm_campaign=spring_intro
Supported campaign details include utm_source, utm_medium, utm_campaign and utm_id, along with supported Google and Meta ad click identifiers. Campaign information is stored in the visitor’s browser for up to 30 days after acceptance.
Use campaign values containing letters, numbers, spaces, dots, underscores or hyphens, with no more than 100 characters per UTM value. Avoid names, email addresses, health information or other personal details in these values.
This does not connect activity across devices or bring app activity into your landing page reports. If someone moves from the browser to the Clovo app, actions they complete in the app are outside this setup.
Check your setup
- Save the settings and open your public landing page in a separate browser or private window where you are signed out.
- Confirm that the cookie banner appears and that Privacy policy opens your studio’s published policy. If this browser already has a saved choice, use Cookie settings to reopen it.
- For your own test visit, select Accept optional cookies and open the main landing page or another eligible public page.
- Check the connected Meta or Google account for the corresponding page-view activity. Make sure you are looking at the account matching the ID you saved.
- If you are checking conversions, look for the event corresponding to an action you actually completed. Viewing a registration form does not test a completed registration, and opening checkout does not test a successful purchase.
Reporting totals need not match all activity in Clovo. Visitors who reject optional cookies are not included, and activity inside the mobile apps is outside this integration. Browser privacy controls or blockers can also prevent measurement.
Change or turn off tracking
To stop Meta tracking, clear Meta pixel ID and save. To stop Google tracking, clear Google tag ID and any populated Ads conversion destinations, then save. Leaving Ads destinations filled in without a Google tag causes a validation error.
To pause tracking for both providers while keeping their IDs, turn off I have reviewed this policy and want to publish it and save. This unpublishes the studio privacy policy as well as pausing tracking. The landing page can stay published.
To resume, review the current policy, switch its publication control on and save. Visitor consent is still required. Removing a provider or pausing tracking does not delete data already held in your provider accounts.
Troubleshooting
Clovo will not accept the ID
Check that the Meta ID contains only 5–32 digits. For Google, use an ID beginning with G-, GT- or AW-, not GTM-. Remove scripts and surrounding text. An Ads conversion destination needs both the AW- ID and its /label, and requires Google tag ID to be present.
The cookie banner does not appear
Confirm that you saved at least one provider ID and published a non-empty studio privacy policy. Check that you are on your public Clovo landing page. If a choice was already saved in this browser, use Cookie settings to reopen the banner.
Page visits appear, but conversions do not
Check that the action was completed through the landing page with optional cookies accepted. An existing client signing in is not a new registration. A pending or failed payment is not a successful purchase. For direct Ads reporting, also check that the correct action’s full conversion destination is saved.
Registrations or purchases seem to be counted twice in Ads
Check whether you are using both a direct Ads destination and an imported Analytics conversion for the same action. Choose the route you want to use and remove the duplicate route.
App bookings or activity on another device are missing
That activity is outside these settings. The pixel and tag apply to Clovo landing pages only; they do not enable device tracking or tracking inside the Clovo mobile apps.
Related articles
Change the subdomain of your landing page
Every studio on Clovo gets a landing page as standard. Your landing page lives at a subdomain like yourstudio.clovo.app, and you can change this subdomain at any time to better match your brand name.
Enable browser based bookings and payments with landing pages
Clovo landing pages are designed to make it easy for potential clients to browse your offerings, book classes, and purchase memberships or credit packs — all from a web browser without needing to install the app.
Give your clients branded support
Every Clovo studio has a member-facing help centre, live right now, with no setup required. It sits on your landing page, it’s written in your studio’s voice, and it wears your branding.
Changing the order that plans, packs and trials show in your apps and landing pages
Choose which packs, plans and trials appear first in the Clovo app and landing pages, so you can highlight your best-value or featured products.