
Tracking and fulfilling Member Shop sales

Tobias Gundry
Updated
When a member buys something from your Member Shop, the sale is recorded and waits on the Sales tab until someone hands the item over. This article covers reading that list, closing an order once it has been collected, and deciding whether each sale should also create a task for your staff.
Viewing your sales
Go to Products > Shop and open the Sales tab. It lists every paid Member Shop sale, newest first.
- Sale — a short reference for the order, with the date and time of purchase in your studio's timezone. The same reference heads the sale itself, so it is what to quote when discussing an order with a colleague.
- Customer — the member who bought the item.
- Product — the item, with the quantity and the line total beneath it.
- Pickup — the location the member chose to collect from.
- Status — Pending pickup while the order is outstanding, or Picked up once it has been handed over.
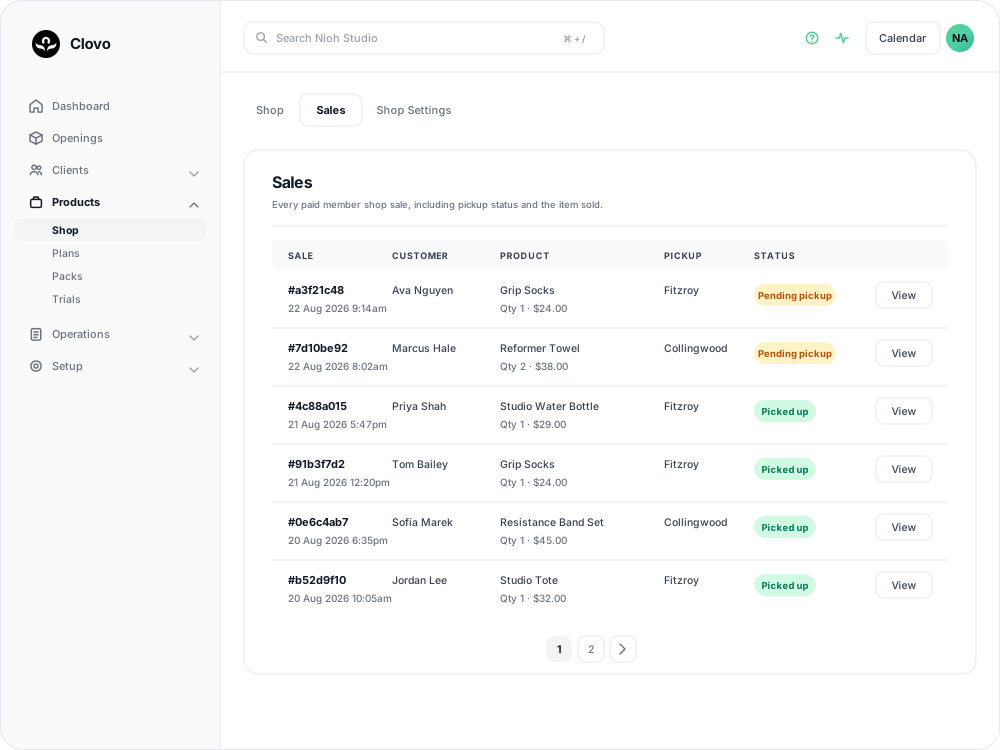
Only paid sales reach this list. If a member says they ordered something and it is not here, their payment did not complete, and there is no order for you to fulfil. Counter sales you take with Shop Sale do appear here, and they start as Pending pickup like any other order.
Opening a sale
Select View on a row to open the order. The heading repeats the short reference, followed by the purchase date and time and where the sale came from: Mobile, Landing page or Staff dashboard.
The item table shows the product title, description, SKU, quantity, unit price and total as they were recorded at the moment of sale. Editing the product later does not change what this order says was sold, so an old sale still shows the price the member actually paid.
The Pickup panel beside it holds the customer's name, which links through to their profile, the pickup location, the total paid, and whether the order has been collected.
Marking an order as picked up
When you hand the order over, select Mark Picked Up in the Pickup panel. The order’s status changes to Picked up.
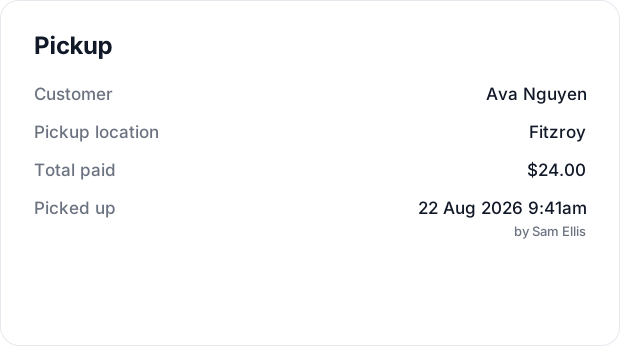
Clovo has no way to undo this from the sale. Mark the order when the member has collected the item, rather than while it is being prepared.
Members are told their order is ready
As soon as payment succeeds, the member receives a push notification and an email headed Your order is ready, naming the product and the pickup location, with their receipt attached. Owners and staff with the Finance role receive a Shop purchase notification at the same time, listing the product, quantity, pickup location, amount and a link to the Stripe receipt.
Because the member is told straight away, they can arrive before anyone has looked at the Sales tab. If your shop sells items that have to be fetched from storage, check pending orders at the start of a shift so they are ready when a member arrives.
Creating a task for every sale
If you would rather work through pickups on the tasks board than watch the Sales tab, Clovo can raise a task for each order. Go to Products > Shop, open the Shop Settings tab, switch Automatically create tasks on under Automations, then select Save Settings.

Each sale paid from then on creates a task called Fulfill member shop sale, describing the product, quantity, pickup location, sale ID and time of purchase. The buyer is set as the task's related user and the pickup location as its location, so the card carries both. Sales that were paid before you saved the setting are not given tasks.
The task arrives in the UNASSIGNED column, and an unassigned task cannot be moved anywhere. Open the card, choose a person under Assignee and save it; the card then gains its drag handle and its Move to buttons.
Tasks sit on top of the Sales tab rather than replacing it. Moving the task to Done does not close the order — the sale stays Pending pickup until someone selects Mark Picked Up — so keep doing both, or leave the setting off and work from the Sales tab alone.
Finding one member's orders
When a member asks about a purchase of their own, open their profile and select the Sales tab. It lists their paid Member Shop orders with the date and time, the product and quantity, the pickup location and the same status badge, and View opens the full sale.
Stock and sales
Stock at the chosen pickup location drops as soon as payment succeeds. The reduction appears in the product's stock history for that location with the reason Sale and a View Sale button that opens the order behind it.
If an order is cancelled or returned, put the stock back by adjusting the quantity on the product's detail page. See Managing stock and inventory in the Member Shop for how adjustments work.
Related articles
How to create a product in the Member Shop
Work through the product form field by field, including the $5.00 minimum price, the pickup locations you cannot detach later, and the fact that a saved product cannot be deleted.
Managing stock and inventory in the Member Shop
The Member Shop includes a complete stock management system that tracks inventory separately for each of your studio locations. Every stock change is recorded in a detailed ledger so you always have a clear history of what happened, when, and why.
Sell a shop product to a client at the front desk
Take a Member Shop product through POS Purchase: choose the pickup location, take the card payment, and know what reaches the member afterwards.
Getting started with the Member Shop
What the Member Shop sells, where members see it, and what has to be in place before your first product goes on sale.