
Organise client profiles with tags

Tobias Gundry
Updated
Create colour-coded tags for your studio, apply them to client profiles, and filter your client list by the tags that matter.
Tags are labels you create once for the studio and then apply to as many clients as you like. They cover the things Clovo has no field for — how someone found you, which programme they are in, who is waiting on a call back — and the client list can be filtered by them. Tags are private to your studio and are never shown to clients.
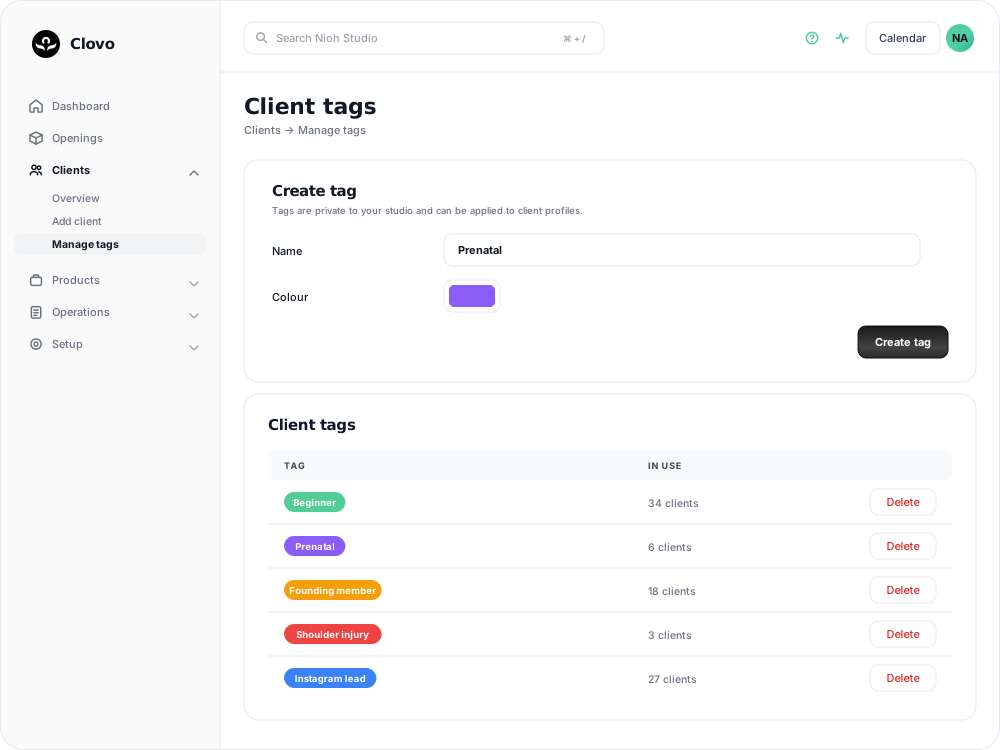
Create a tag
Tags belong to the studio rather than to one client, so they are created on their own screen.
- Go to Clients → Manage tags.
- Enter a Name. Names are between 2 and 50 characters, and each name can be used once in your studio.
- Choose a Colour. The tag appears as a coloured chip everywhere it is shown, so pick something you will recognise at a glance.
- Select Create tag.
The tag appears in the Client tags list below the form and is ready to apply.
Tags cannot be renamed after they are created. If a name no longer fits, create the replacement tag, apply it to the clients that need it, then delete the old one.
Apply a tag to a client
Open the client's profile and find the Tags section.
- Pick the tag from the Choose tag list.
- Select Add tag.
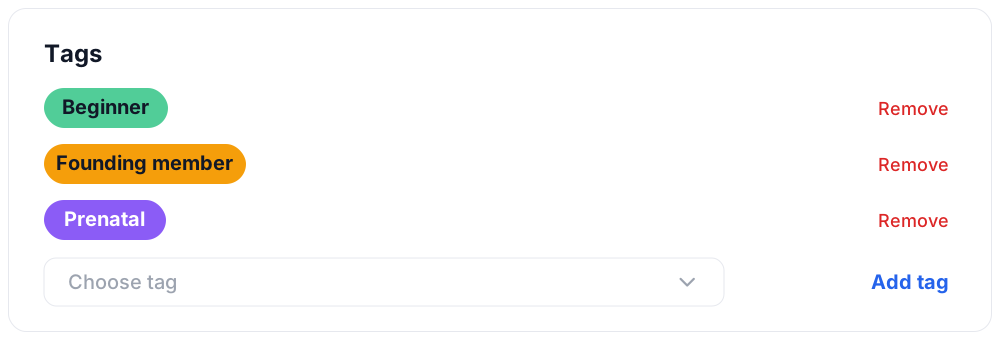
Only tags that already exist in your studio can be applied here, so create the tag first if it is not in the list.
To take a tag off, select Remove beside the chip and confirm. Removing a tag from one client leaves it in place everywhere else.
Tags are for client profiles only — a staff or admin account has no tag picker. You can remove a tag from an archived client, but you cannot add one.
Find clients by tag
Go to Clients → Overview and use the Filter clients row above the list. Select a tag chip and the list narrows to the clients carrying that tag, with the number of matching clients shown beside the filters.

Before you rely on tags, note:
- Selecting more than one tag narrows the list further. A client has to carry all of the selected tags to appear, so Beginner plus Founding member returns only the people who are both.
- Tagged only returns every client carrying at least one tag, whichever tag it is.
- The list refreshes as you select, and Clear drops all of the filters at once.
- A tag that no client on the current tab carries is moved to the end of the row and cannot be selected, so the available filters match the clients on that tab.
- Your selection carries across the All, Active clients, Inactive clients and Paused clients tabs. The Archived clients tab has no tag filters.
Delete a tag
On Clients → Manage tags, the In use column shows how many clients currently carry each tag.
Selecting Delete asks you to confirm and names the number of clients affected. Deleting a tag takes it off every client carrying it, and that cannot be undone. Recreating the tag afterwards gives you an empty tag that has to be applied again, one client at a time.
The In use count leaves out archived clients. A tag showing 0 clients may still sit on archived profiles, and deleting it removes it from those too.
Tags in your client export
Each client's tags travel into the client CSV as a single Tags column, with multiple tags separated by a vertical bar — Beginner | Reformer. Most spreadsheets and mailing tools can split that column during import, which is what makes tags useful for segmenting a list outside Clovo. See Export your client data.
Who can see tags
Clients never see their tags. Everyone with access to your client list does: tags show on the Clients list, on the client's profile, and in the Clovo app, where staff see them beside a client's name in the client list and on class booking and waitlist screens.
That reach is what makes tags useful at the front desk, and it is also the reason to think about what a label says. A tag recording an injury or a health condition is visible to every staff member and readable on a screen a client may be standing next to.
Related articles
Add a client to your studio manually
Create a client profile from the dashboard, record the required consent dates, confirm the email address, and understand which emails the client receives straight away.
Archive a client without deleting their history
Archive a client to hide them from day-to-day lists and stop them signing in, while keeping their record so you can bring them back later.
Deleting a client from your studio
Schedule a client for permanent deletion, cancel it while the grace period is still running, and understand when immediate deletion is available.
Track attendance by checking-in clients on your phone or desktop
Check clients in to record who attended a class in addition to who booked.