
Use a waitlist to fill a cancelled place

Tobias Gundry
Updated
When a cancellation opens a place in a full class, a waitlist helps offer that place to another client.
Turn the waitlist on
Waitlists are a class setting, not a per-occurrence one. Switch it on once and every opening of that class gets it.

- Go to Setup → Classes and open the class.
- Turn on Allow Waitlist.
- Choose the waitlist type that appears below it.
- Update.
Clients can join the waitlist once a class is full. While places remain available, they use the usual booking process.
Choose how the waitlist processes
The type decides what happens when a place becomes free. Clovo offers three options, depending on how much control and staff involvement you want.
Auto — when a booked client cancels, Clovo books the next eligible person in the queue. No staff action is required.
Manual — the place is held and your team is notified. A staff member chooses which waitlisted client to book.
Offer — every client on the waitlist is notified that a place is available, and the first eligible client to book receives it. The remaining clients stay on the waitlist.
What "Waitlist Locked" means
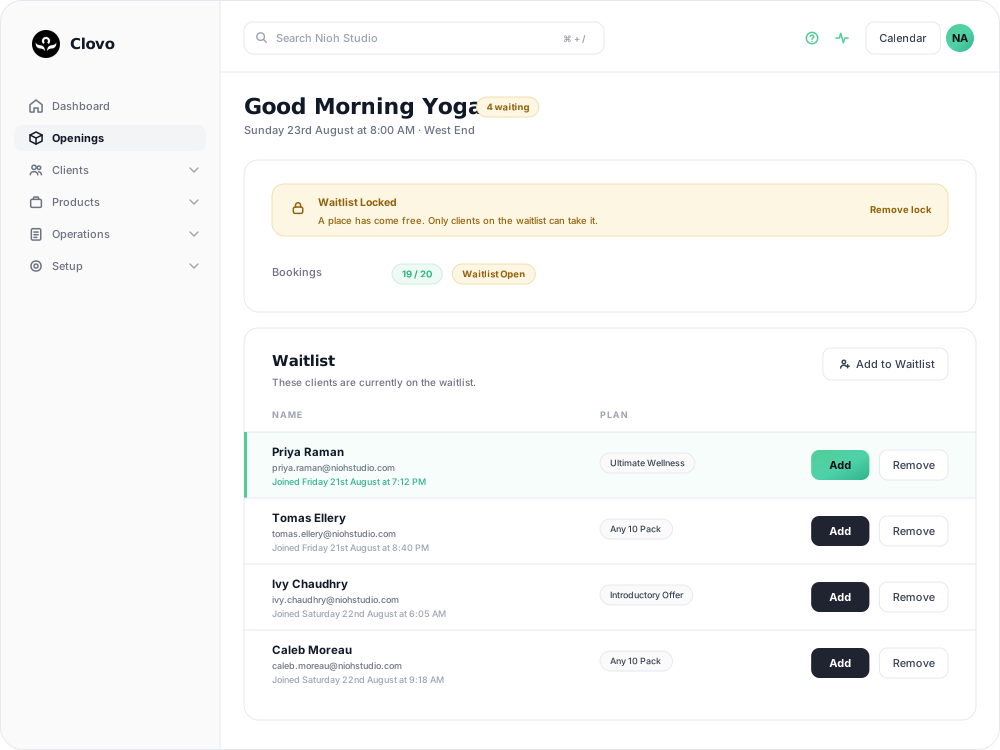
Between the cancellation and the place being filled, the opening is waitlist locked. Only clients already on the waitlist can take the place; it is not available to other clients browsing the timetable.
You will see a Waitlist Locked badge on the opening, with a Remove lock link beside it. Removing the lock releases the place to anyone.
How long the lock lasts depends on the type:
- Auto — the lock clears shortly after the cancellation, once Clovo has booked the next client. It is not instant, so a lock still showing a minute later is normal.
- Manual — until a staff member processes it. The place remains locked until your team takes action.
- Offer — until one of the notified clients books it.
Add a client to the waitlist from the dashboard
Add to Waitlist on the opening queues someone from your side — for the person who rang the studio rather than opening the app. Choose the account owner, then choose the plan the entry will use.
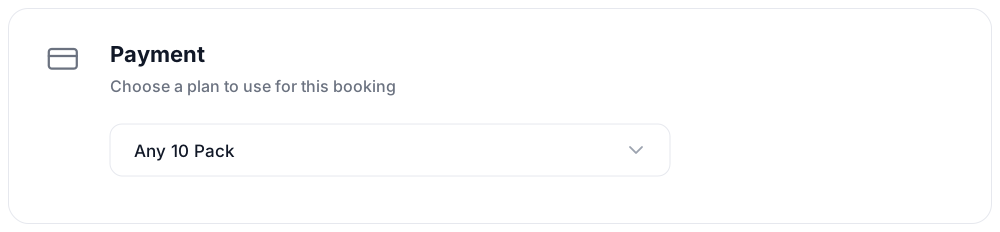
The Payment card asks you to choose a plan to use for this booking. It lists the client's active memberships and packs, and marks any that cannot be used for this class. If the client has nothing active, the card shows No Memberships and the client needs a plan before they can be added to the queue.
The plan you pick here matters twice over: it is the credit that gets spent if the entry books, and it is what decides whether the entry counts as a membership for priority. A client joining from the app picks their plan the same way.
Read the waitlist on the opening
The Waitlist card lists everyone queued, with each client's name, email, when they joined, and their Plan. The Plan column shows the plan attached to that waitlist entry, which may not be the client's only plan.

Each row ends in one of three states:
- Add and Remove while the client is still waiting.
- A green tick and Booked on, with the date and time, once the place went to them.
- Failed on, with the date and time, in red when the entry can no longer be booked.
A failed entry does not keep waiting, and the client is notified. This happens to a pack or trial entry when its credits have run out, the pack has expired, or the class is not one that plan covers. A membership entry stays in the queue and is tried again the next time a place opens, unless the membership itself is no longer active. If the client still wants the class, add them back with a plan that works.
Book someone in, or take them off
Add on a waitlist row books that client straight into the class. A confirmation screen tells you what it is about to ignore:
- Waitlist queue order will be ignored. The client is added regardless of where they sat in the queue.
- Class size will be ignored. This appears only when the opening has no places left, and means you are going one over capacity.
If the client's credit pack has no credits left, the screen shows Cannot move from waitlist and Confirm is unavailable. Eligibility is checked when the entry is processed rather than when the client joins, so a client's eligibility can change while they are waiting.
Remove takes a client off the waitlist without booking them.
Give members priority over packs and trials
By default a waitlist is processed in the order clients joined it, whatever plan they are on. A studio-level setting changes that, so membership entries are offered the place before credit pack and trial entries.
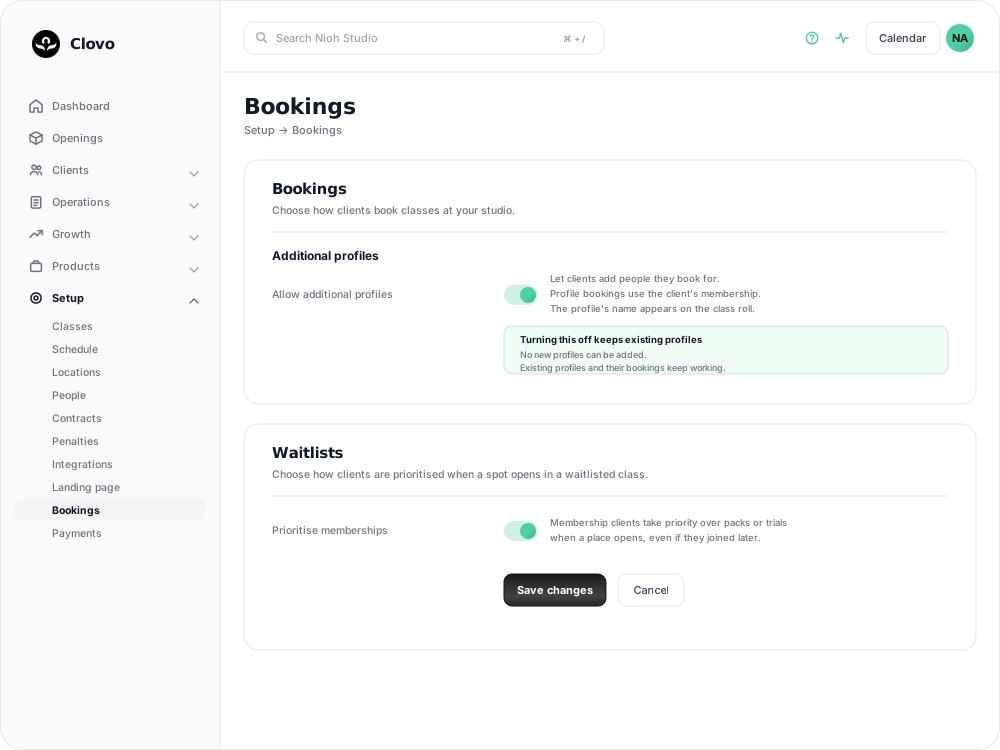
- Go to Setup → Bookings.
- Turn on Prioritise memberships.
- Save changes.

Say a full class has three people waiting:
| Position | Client | Plan on the entry | Joined waitlist |
|---|---|---|---|
| 1st | Sarah | Credit pack | 9:00 AM |
| 2nd | James | Membership | 9:05 AM |
| 3rd | Mia | Trial | 9:10 AM |
Without the setting, Sarah takes the place because she joined first. With it on, James takes it. If a second place opens, Sarah is next.
- Members are still ordered among themselves by when they joined, and so are pack and trial clients.
- Trials rank with credit packs, behind memberships.
- A client who holds both a membership and a pack is ranked by whichever plan is on their waitlist entry, which you can see in the Plan column.
- Priority is applied when a place opens, not when a client joins. Turning the setting on reorders people who are already waiting, and turning it off returns everyone to join order.
What else to know
- A waitlist only processes when someone leaves. If no one cancels, the class remains full and the waitlist does not move.
- Clients queue for themselves only. Linked profiles cannot be added to a waitlist, so a parent who queues for a full class is queueing for themselves.
- Waitlists are not affected by your booking cutoff. If you have set a booking cutoff, clients can still join the waitlist after it, and places that open are still booked or offered as usual.
- Direct Purchase is unavailable while the waitlist is open. A full class with an open waitlist cannot be bought into as a one-off. See letting clients book without a membership or pack.
- Super credits do not work on waitlists. They are for booking, not queueing.
- Joining a waitlist does not spend a credit. The credit is taken if and when the booking is actually made.
Pair it with penalties
A waitlist has more time to fill a place when clients cancel earlier. Explain your cancellation window and whether a late cancellation or no-show keeps the booking credit or incurs a fee. Financial penalties only apply to bookings made with an auto-renewing membership billed through Stripe; class pack and trial bookings forfeit the credit instead. See Set up late cancellation and no-show penalties.
Related articles
Book a client into a class from the studio dashboard
Book a client into a class from Clovo Dashboard when they call, walk in, or ask your team to make the booking for them.
Set up late cancellation and no-show penalties
Set late cancellation and no-show rules, choose credit forfeiture or membership-only fees, and check the penalties applied to bookings.
What does the customer journey look like?
See the customer journey in the Clovo app: finding your studio, exploring, signing up, purchasing a pack, booking a class, and receiving confirmation and reminders.
Close bookings before a class starts with a booking cutoff
Choose how long before a class starts clients can no longer book, so your team has time to prepare for the people attending.