
How to manage your studio from an iPad

Tobias Gundry
Updated
Use the Clovo app on an iPad to manage bookings, check clients in and follow up with your team. The current app requires iPadOS 16.4 or later.
Get started
- Install Clovo from the App Store.
- Find your studio and sign in with your owner or staff account.
- Open the Admin tab.
Staff accounts can use the app’s admin tools even when Web Dashboard Access is off. That setting controls signing in to the browser dashboard.
Find the tools you need
The admin area includes Upcoming, Clients, Tasks, Announce, Share and Kiosk. Depending on your screen layout, some tabs may appear under More.
- Upcoming lists classes and the clients booked into them. Find the day and class, then use Check in beside a client or open the class to manage its bookings.
- Clients lets you search for a client and open their profile to review memberships, packs and bookings.
- Tasks lets you create and follow up on staff work.
- Announce lets you send announcements to clients.
- Share creates timetable images for your social channels.
- Kiosk opens the self-service check-in scanner.
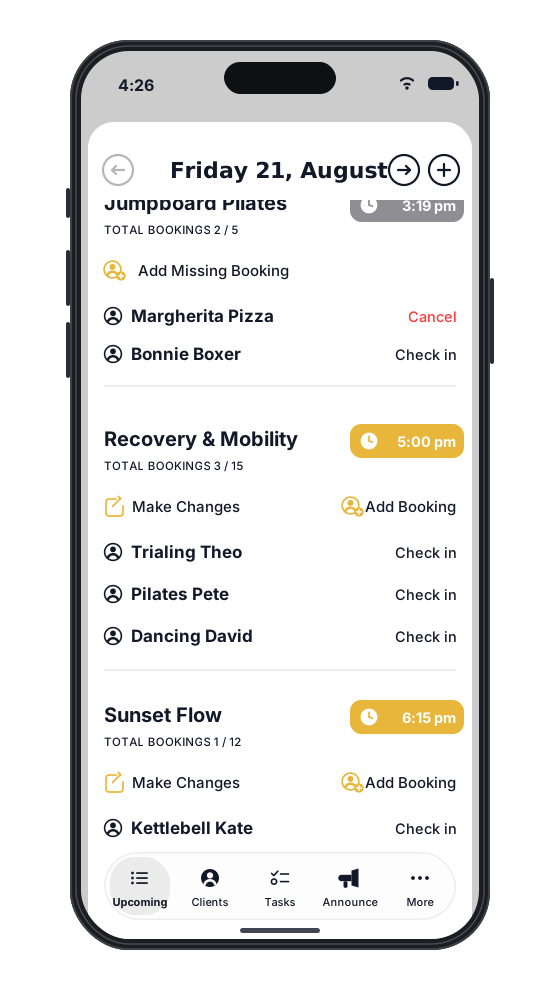
Check clients in at the front desk
In Upcoming, find the class and tap Check in beside each client who has arrived. To undo an accidental check-in, tap Cancel on that row and confirm Cancel Check-in. This removes the attendance mark without cancelling the booking.
See Track attendance on your phone or desktop for the full workflow.
Let clients check themselves in
Open Kiosk in the admin area, then select Launch Kiosk. Members scan the pass in their own Clovo app using the iPad’s camera.
Follow Set up the self-serve kiosk for scanning and location filters. For an unattended reception device, set up Guided Access to keep the iPad in Clovo.
Clients using their own iPad
Clients can also use Clovo on their own iPad to browse classes, book sessions and manage their memberships. The admin tools appear only for owner and staff accounts.
Related articles
Get started in the Clovo app when your studio moves to Clovo
Your studio now takes bookings through Clovo and has already set up your account. Download the app, find your studio, then sign in with a code sent to your email or set a password with a reset.
Getting started with Clovo: your complete setup guide
Take a new studio from registration to its first bookable class, following the setup checklist on your Clovo dashboard step by step.
Understand Clovo app download size and storage
Check how much data Clovo needs to download, how much space it uses on your phone, and why a small app download matters for your business.
Use dark mode in Clovo
Switch the Clovo Dashboard to dark mode from your account menu, understand where the setting is remembered, and see how the iPhone and Android apps follow each person's own device.