There will be times when you need to move a client’s existing booking to another opening — perhaps the client asked to switch to a different time, or you need to rebalance attendance across classes.
How to move a booking
Log in to Clovo Studio on the desktop.
Navigate to the Openings page and find the class the client is currently booked into.
Click Manage on the opening to view the list of bookings.
Find the client’s booking and select the option to move it.
Choose the new opening you’d like to move the client to.
Confirm the move. The client will be notified of the change.
Things to keep in mind
The destination opening must have available capacity for the booking to be moved.
Moving a booking does not use an additional credit — it simply transfers the existing booking to a new time slot.
The client will receive a notification about their updated booking details.
You can also move bookings from the Clovo iOS app if you’re managing your studio on the go.
We don’t gate keep your data. You can export your client list from Clovo at any time as a CSV file, which can be useful for those occasional times you need your client data for a system we don’t integrate with, for your accountant, or simply for your own records.
How to export your client data
In Clovo Studio, navigate to Clients.
Click the Export button.
A CSV file will be generated and downloaded containing your client data.
What’s included in the export
The CSV export includes client details such as:
Client name and email address
Phone number
Date they joined your studio
Tags applied to their profile
Active product information
Common uses for exported data
Email marketing — import your client list into a tool like Mailchimp for newsletters
Accounting — provide your accountant with client records
Backup — keep an offline copy of your client data for peace of mind
Analysis — use a spreadsheet to analyse client trends, retention, or demographics
The export always reflects the current state of your client list at the time of download. Your data in Clovo is never locked in — it’s your studio and your clients.
Your clients can now book classes for themselves or for a linked friend, family member, or dependent profile — all from the same account. This makes it easy for parents, partners, or carers to manage bookings for the people they’re responsible for.
What your clients can do
Create linked profiles — clients can add profiles for family members, dependents, or friends directly from their account
Book on behalf of others — when booking a class, clients can choose which profile the booking is for
Manage multiple schedules — clients can view upcoming bookings for all linked profiles in one place
Purchase products for linked profiles — memberships and credit packs can be purchased for any linked profile
How linked profiles work
Each linked profile has its own booking history, product ownership, and attendance record. The primary account holder manages all profiles and handles purchases and payments. Linked profiles do not need their own email address or separate Clovo login.
What this means for your studio
As a studio owner, linked profiles appear as separate clients in your system. You can see who booked on behalf of whom, and each profile’s attendance and product usage is tracked independently. This feature is especially popular with family-oriented studios, kids’ programs, and studios where one person often books for a group.
Most of the time you’ll want to let your clients complete their own purchases in the Clovo app or on your landing page. But if your studio accepts walk-ins or you need to process a sale in person, Clovo’s Point of Sale feature lets you handle that directly from the studio dashboard.
When to use Point of Sale
Point of Sale is useful in scenarios where a client isn’t completing the purchase themselves through the app:
Walk-in clients — a new client arrives and wants to sign up on the spot
In-studio purchases — a client wants to upgrade their plan or buy a credit pack while at the studio
Cash or card on-site — processing payments at the front desk
How to process a Point of Sale transaction
In Clovo Studio, navigate to the client’s profile (or create a new client if they’re new).
Select the product you want to sell them — a membership, credit pack, or trial.
Complete the purchase on behalf of the client. Clovo will process the payment through Stripe if you have it connected.
The client will receive a purchase confirmation and the product will immediately appear in their Clovo app.
Point of Sale purchases work exactly the same as app-based purchases — the client gets the same product, the same notifications, and the same booking access.
This might be a surprise to hear, but handling membership pauses can be one of the most important aspects of running your studio.
No matter how dedicated – each and every one of your clients will likely need to pause their membership at least once throughout the year. It’s just part of the business of running a studio.
But what’s important is how you approach getting that client back in and booking with your studio post pause. Clovo has a powerful pause feature to automate this process, so your clients go from on-pause back to on the class list as smoothly as possible.
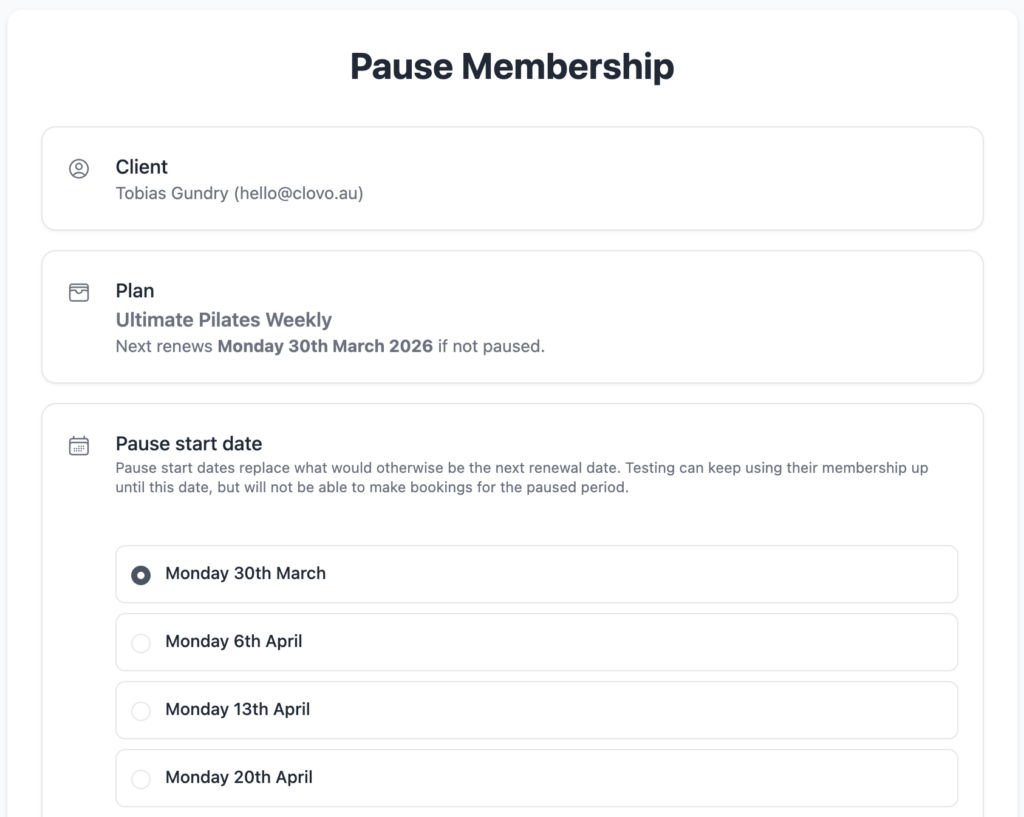
Pausing a client’s membership
To avoid misuse, clients are unable to pause their membership directly. Pauses must be made by the studio owner or a member of staff. To pause a client’s membership, browse to or search for the client in Clovo, open their profile, then open the membership that needs to be paused.
Choose options
Choose a date to start the pause
Pause dates are aligned with renewal dates so that pauses don’t interfere with existing billing cycles or restrict clients from being able to use paid for benefits.
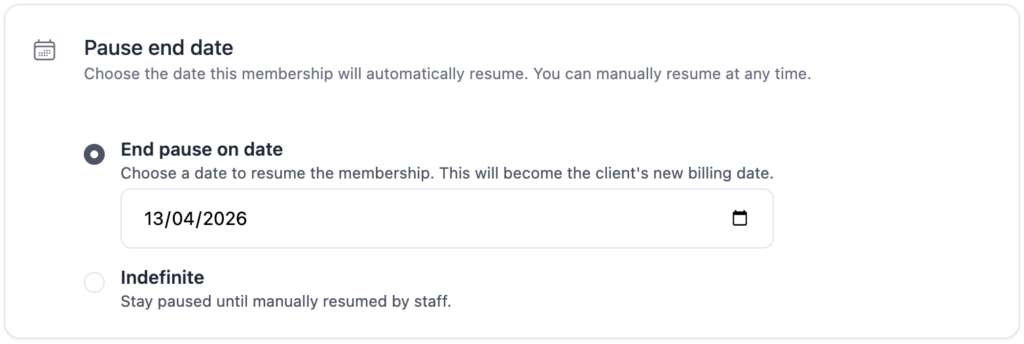
End the pause on a given date or pause indefinitely
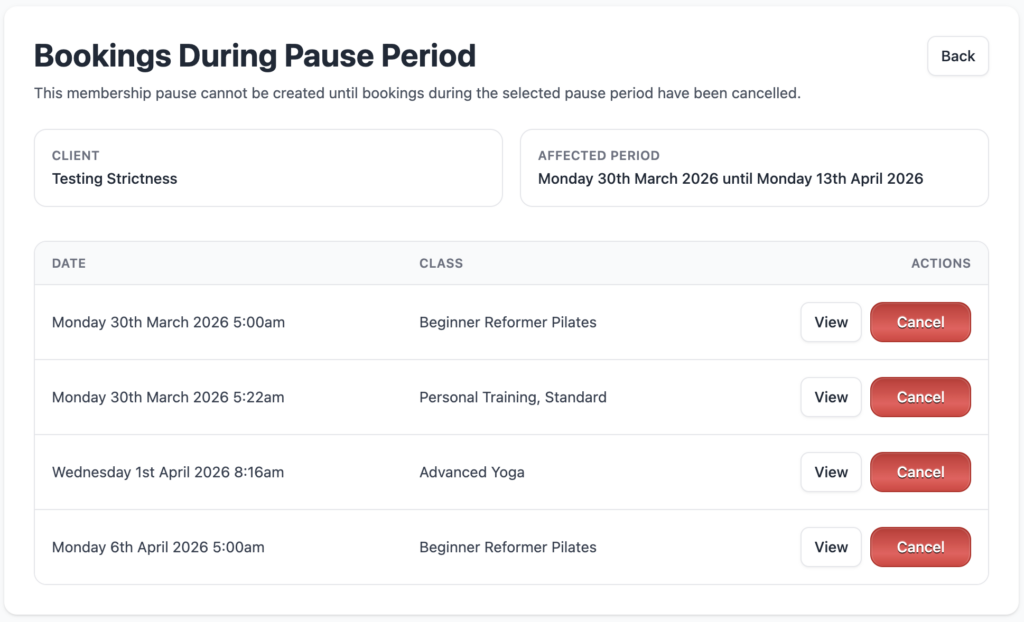
Bookings cannot be made during the pause period
When a membership is paused, it cannot have bookings during the paused period.
If your client has existing bookings during the proposed pause period, you will not be able to pause the membership.
However, Clovo will step you through cancelling any existing bookings during the pause period as seen in the screenshot below.
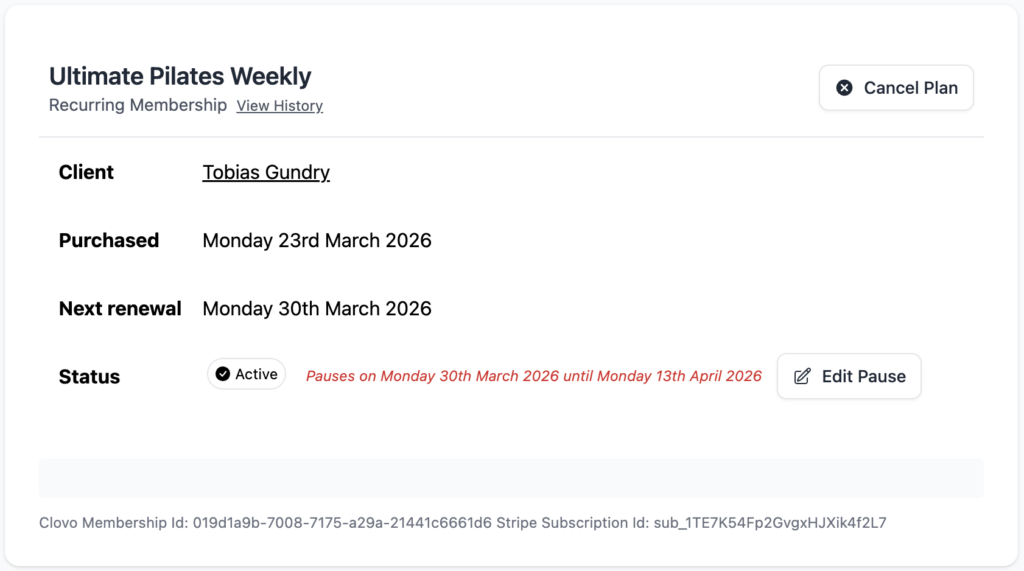
Resuming a client’s membership
If you set a resume date when pausing the membership, there’s nothing left to do. The membership will be resumed on the date you selected automatically.
Resuming automatically
Where possible, it’s always best to lock-in a resume date with your client. This way, Clovo will automatically restart the client’s membership at a date in the future, instantly billing the client, and reinstating their ability to book classes.
When a resume date is set, it also means that the client can book in classes for when they return while on pause. Which is a great feature to encourage their return to their routine with you.
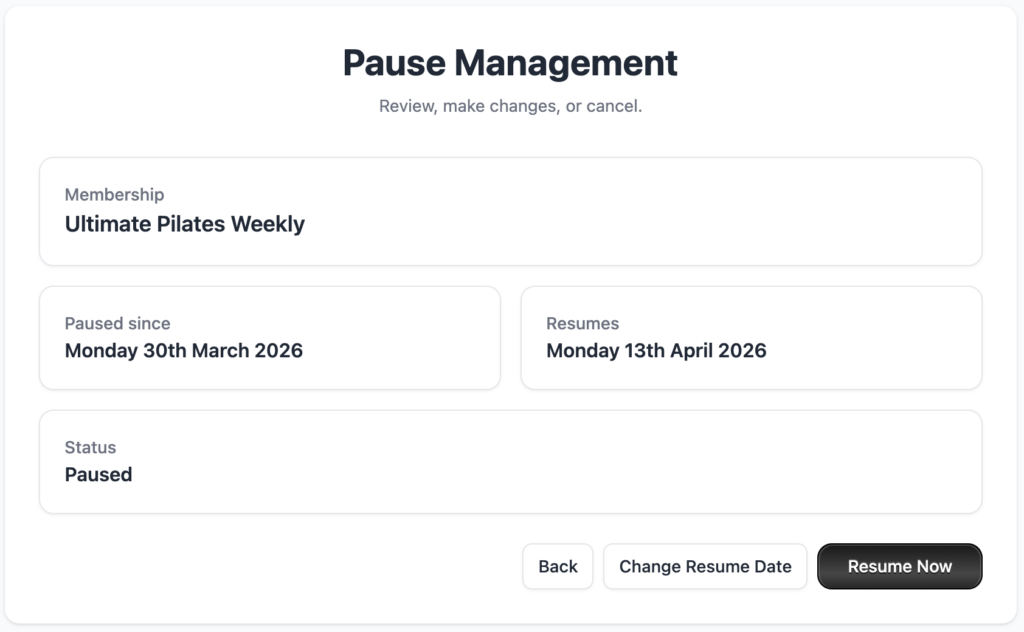
Changing a resume date
You can change the client’s resume date at any time.
Resuming a membership manually
If a membership was paused indefinitely or your client wishes to resume earlier you can manually resume a paused membership at any time.
Just browse or search the client in Clovo, tap into their membership, click ‘Edit Pause’ then the ‘Resume Now’ button.
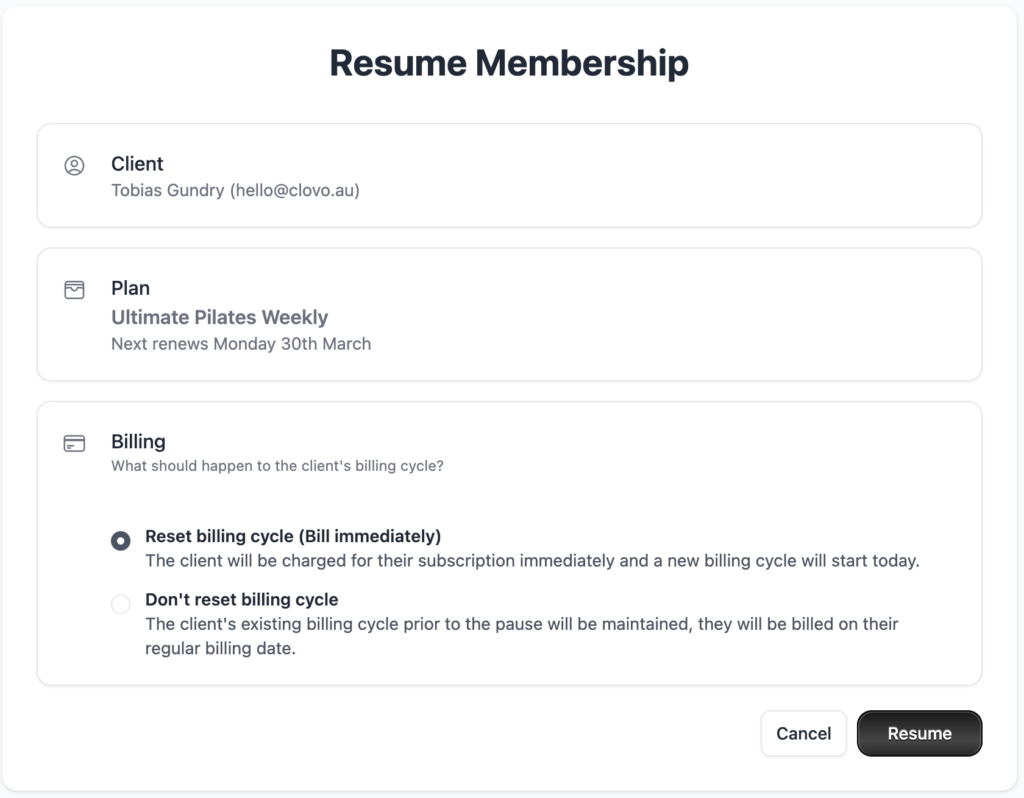
When resuming a membership manually, you must choose what happens to the clients billing cycle. You can choose from:
Reset billing cycle: this is most likely the option you want. This will reset the client’s billing cycle to start from today and instantly bill the client when you click ‘Resume’.
Don’t reset billing cycle: you will likely only use this option if your client has specifically requesed their existing billing cycle remain untouched.
Note if you choose NOT to reset the billing cycle, you are effectively comping any time between when you resume the membership and when the next billing cycle occurs. The recommend action is to reset the billing cycle, which is the default selected option on this screen.
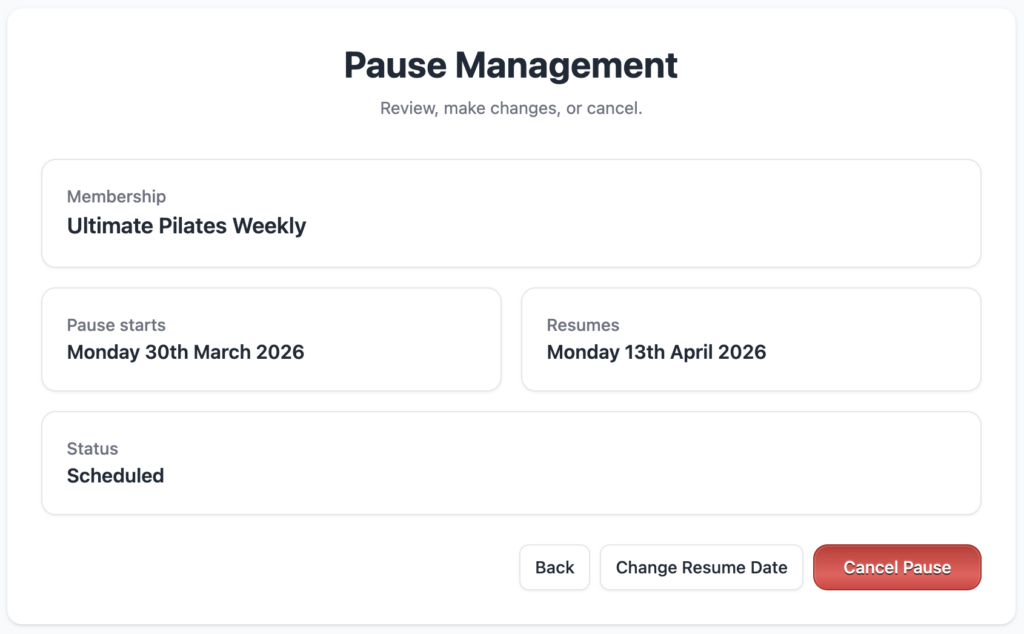
Cancel a scheduled pause
If you’ve set a client’s membership to pause at a future date but something’s changed and the client no longer wants their membeship paused, you can easily cancel the scheduled pause.
Just click on the ‘Edit Pause’ button from the membership view screen
Then click ‘Cancel Pause’ from the pause management screen
What happens during a pause?
When your client’s membership is paused they will no longer be automatically charged for their membership fee for the duration of the pause.
Clients cannot book classes for the period their membership is paused. This means if a membership is paused indefinitely, that client can no longer book at all once the pause has begun. However, if there is a resume date set, your client can book for classes that occur after that renew date.
Clients can continue to book outside of pause periods
Your clients are only restricted from booking during the paused period. This means clients can still use their membership for paid for membership periods and for periods when their membership will be active again.
For example:
If it’s the 20th of April and your client has asked for their membership to be paused from the 1st of May until the 14th of May. They will be able to book in line with their membership plan up until the 1st of May and again from the 14th of May onwards.
They will not be able to make bookings for or having existing bookings for the period between the 1st of May and the 13th of May. They can however use their membership between those dates to make bookings for the 14th of May onward, when their membership will be resumed.
April 20th: pause scheduled
May 1st: membership paused, bookings no longer possible
May 2nd – 13th: bookings no longer possible, existing bookings for this period must be cancelled
May 14th: membership set to automatically resume
May 14th and onward: bookings allowed to be made before and during pause period
When the time comes that your studio grows and you want to enlist some help with your classes or administration, Clovo has got you covered with staff accounts.
Staff accounts let you create user accounts with special administrative privileges in your studio.
Once you’ve created a new staff account, the user of that account will have access to the integrated staff app in Clovo as well as Dashboard access.
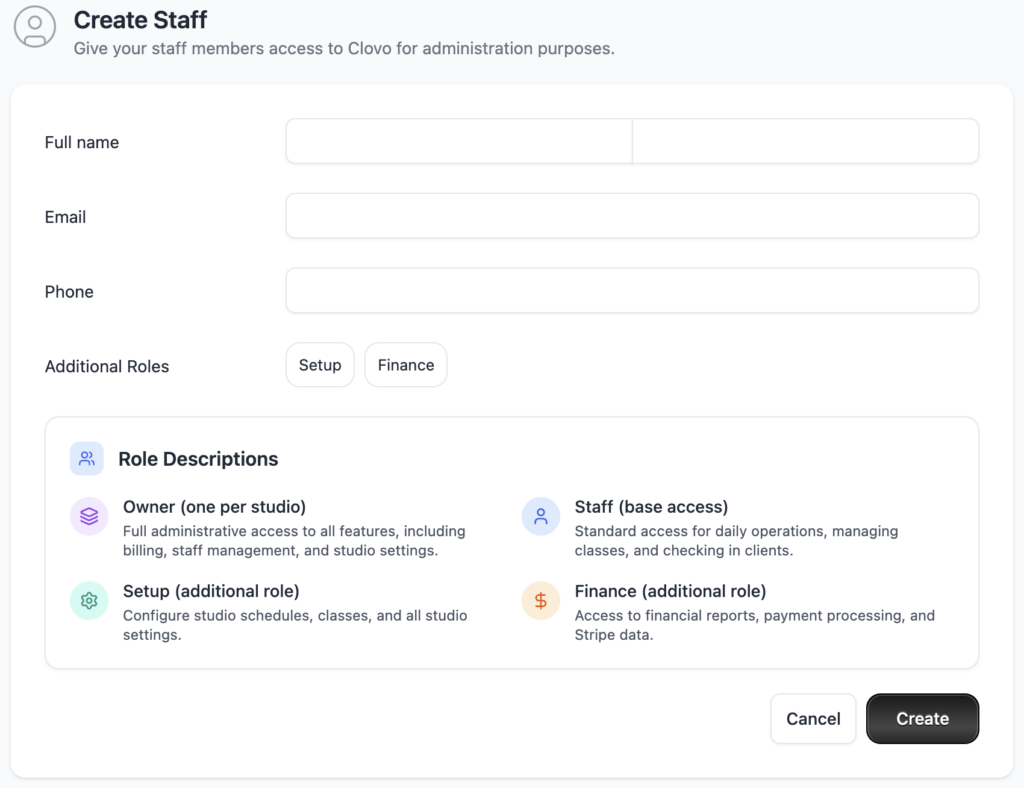
Adding Staff
To add new staff to your studio, login as an owner or a staff user with the ‘Setup’ role.
Navigate to Setup > Staff then tap the ‘Add Staff’ button. Add your staff details and tap create.
What happens after I tap create?
Your new staff member will receive an email notifying them of the account creation as well as a separate email with a link for them to setup their password.
Staff Roles
You can restrict certain accesses in Clovo for staff users.
Owner
The owner role is for the person who first signed up to Clovo when creating the studio. There is only ever one ‘Owner’ role in Clovo per studio. This role is the most permissive in the system with access to all data and features without restriction.
Staff
The base role for all staff members. The staff role allows access to the integrated staff app in the Clovo app as well as login access to the Dashboard with permissions to perform all operations with the exception of some finance and setup features.
It’s important to note that although you can restrict access to detailed financial reports, payouts, balances, and Stripe access by creating a Staff member and not adding the Finance role, all staff are still able to perform actions that may affect your finances such as initiating new purchases for clients, cancelling and pausing memberships, etc.
Web Dashboard Access
The Web Dashboard Access toggle controls whether a staff member can sign in to and use the Clovo web dashboard.
This toggle does not affect the mobile app. You can give a staff member a Clovo account for use on their phone without also giving them access to the web dashboard.
When Web Dashboard Access is turned on:
The staff member can sign in to the web dashboard. Their permissions inside the dashboard are then determined by any additional roles they have, such as Setup or Finance.
When Web Dashboard Access is turned off:
The staff member cannot sign in to the web dashboard. Their mobile app access is unaffected.
If a staff member already has the Setup or Finance role and you turn Web Dashboard Access off, those additional roles are removed when you save. This is because those roles only apply to dashboard access. If you later turn dashboard access back on, you will need to reselect any additional roles they should have.
Setup
The setup role is an additional role you can choose to give to staff members that allows them to access the setup menus in Clovo. This gives the user the ability to not only complete operations in your Studio but to change the fundamental setup of your studio such as classes, studios, and product offering.
Finance
The finance role gives the user the ability to access all financial data within Clovo including account balances and payout schedules. By default staff users without this role, although able to see basic financial data such as prices and renewals, will not be able to see Stripe payouts, account balances, or access the Stripe dashboard.
Remember that due to the nature of being a staff member in a fitness studio, all staff users regardless of whether or not they are given the Finance role, will be exposed to at least some financial information such as prices and membership information.
Furthermore, all staff members are able to perform actions that may affect your finances, such as joining clients to new memberships, changing their membership, or pausing or cancelling their membership, among other actions that may affect revenue.
Many studio owners like to double check attendance by checking clients in who are present at their clients. Checking a client in gives you a record of who or who wasn’t present in person, in addition to the booking.
There are multiple ways to check clients in with Clovo. You can use your phone, iPad, or desktop to accomplish the task, depending on your management style.
Checking in on phone
This is likely the most convenient option for managing check-ins. You can use the Clovo app to manage your attendance on the fly.
The following assumes that you are already logged in to the Clovo app using your owner or staff account.
From the ‘Our Studio’ tab, tap the ‘Manage’ button that appears under your studio logo when logged in as an owner or staff.
You’ll get an overview or your day, with all today’s classes listed. Below each class is a list of clients who’ve booked in for that class.
To the right of client’s name is a ‘Check-in’ button.
Simply tap check-in to check the client in. Did it by accident? Tap again to undo.
Checking in on iPad
If you prefer to use an iPad in the management of your day to day operations of your studio, you can follow the same steps above – with the only difference being that you tap into the ‘Manage’ tab.
Checking in on Desktop
You can also choose to check your clients in using Clovo on the desktop. This is a great option for any studio with a front of house or reception area.
Assuming you’ve already logged in to Clovo studio, you simply navigate to the class you want to check-in a client to, find their name, then click the ‘Check-in’ button.
You can undo check-ins by tapping the undo button.
Have you found yourself wishing you could put one or more of your packs or plans ahead of others in the Clovo app and landing pages? You can control exactly which products appear first, making it easy to promote your best-value offerings or featured products.
Pinning products to the top
Clovo lets you pin plans, packs, and trials so they always appear at the top of your product listings. Pinned products are shown before all other products in both the Clovo app and on your landing page.
How to reorder your products
In Clovo Studio, go to Products.
Find the plan, pack, or trial you want to feature.
Toggle the pin option to move it to the top of the list.
Repeat for any other products you want to prioritise.
Tips for product ordering
Lead with your best-value option — most clients will consider the first product they see, so put your most popular or best-value offering at the top
Pin introductory offers — if you have a trial or introductory pack for new clients, pinning it ensures newcomers see it first
Seasonal promotions — temporarily pin limited-time offers to drive urgency
Keep it simple — avoid pinning too many products, as the purpose of pinning is to highlight a select few
The Clovo app runs natively on iPad, giving studio owners and staff a larger, more comfortable screen to manage the day. Whether you’re using an iPad as a front-desk station, checking in clients as they arrive, or just prefer the extra space — the iPad experience is optimised for iPadOS and works across all iPad models.
Getting started on iPad
Open the App Store on your iPad
Search for Clovo and tap Get to install
Open the app and sign in with your studio owner or staff account
Once logged in, you’ll see the Admin tab appear in the navigation bar
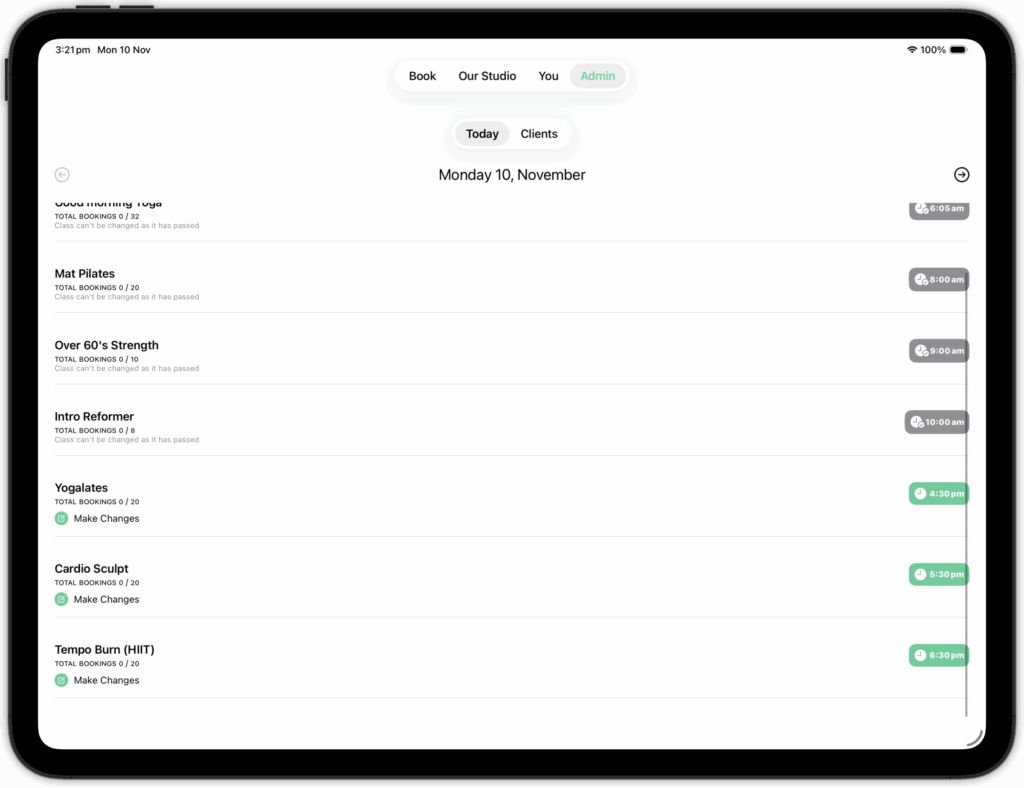
The Admin Tab
The Admin tab is exclusive to studio owners and staff members with admin privileges — clients will not see it. It gives you a real-time view of your studio and the tools to manage it from your iPad.
Inside the Admin tab you’ll find two sections:
Today — A live view of your class schedule for the day. Tap any class to see who’s booked in, mark attendance, and check capacity at a glance.
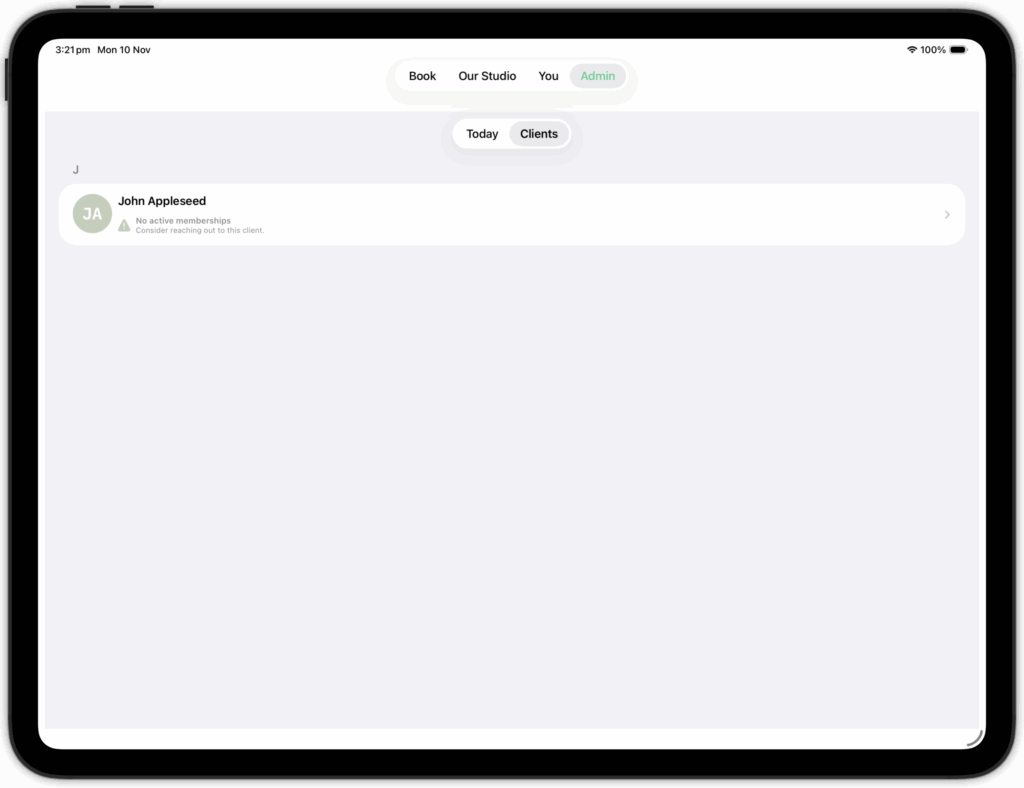
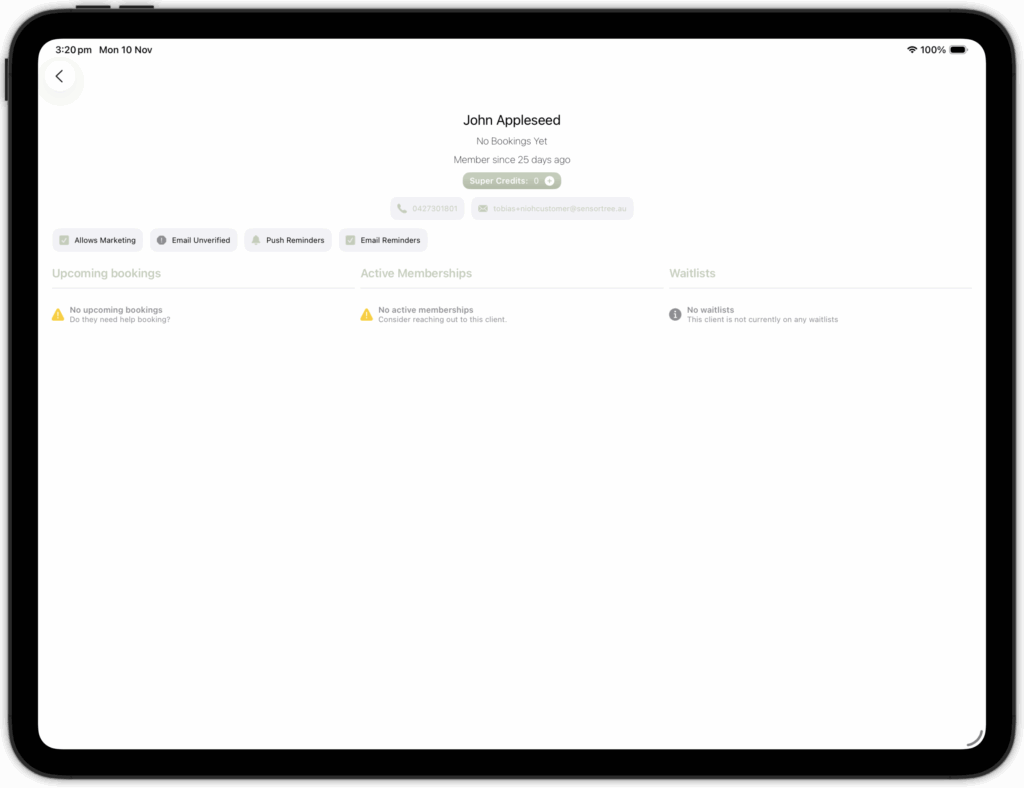
Clients — Browse your full client list, view individual client profiles, check membership and credit pack status, and manage client details on the go.
Using iPad as a front-desk or check-in station
iPad is a natural fit as a front-desk device. You can mount it at your studio entrance and use the Admin tab to check clients in as they arrive for class. The larger screen makes it easy to scan the day’s class list and confirm attendance quickly — without needing to be at a desktop computer.
For studios that want clients to check themselves in, you can hand the iPad to a client at the door — they’ll see the standard client experience and can check in on their own booking.
Clients can use the iPad too
When clients download Clovo to their own iPad, they get the full client experience — browsing the class schedule, booking sessions, managing their memberships and credit packs, and viewing their booking history — all optimised for the larger iPadOS display.
Did you know your existing clients can be your biggest source of new clients?
Many studios want to offer referral programs to incentivise their existing clients to bring their friends and colleagues to their studio.
Clovo allows you to easily setup a fully hands-off automated referral program that will allow your clients to refer their friends from within the Clovo app.
Referrals will automatically email the new referral, apply benefits you configure to their account upon sign-up, and optionally credit your existing client for the referral either upon joining or upon the referred client spending a minimum amount at your studio.
How to setup your referral program
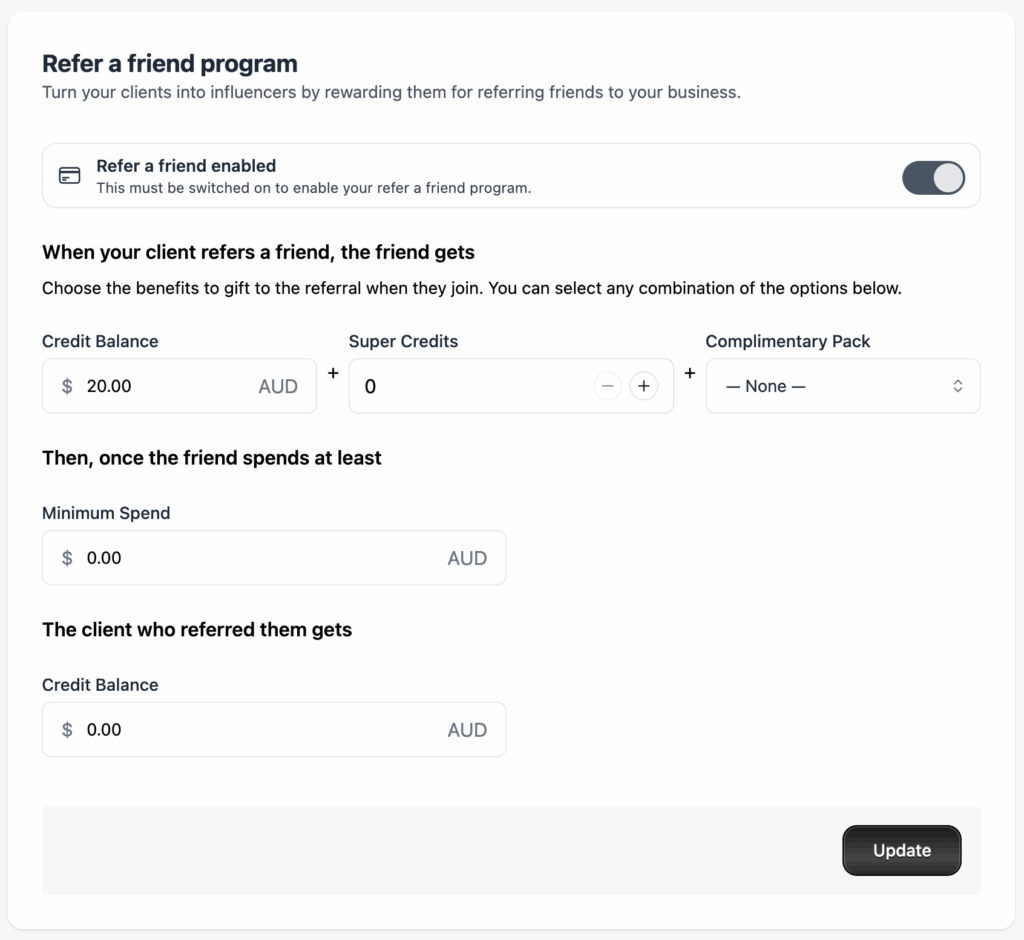
In Clovo Dashboard, simply go to Setup > Refer a friend. Toggle the refer a friend program to on and fill in your referral benefits.
Note that the refer a friend switch must be toggled on for the refer a friend program to show in client apps. If you have not enabled the refer a friend program, there will be no mention of a referral program in your client apps.
How to see referrals
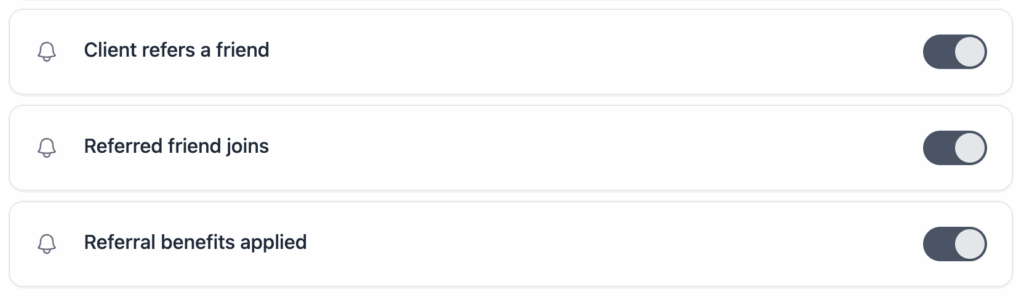
You will receive notifications of referrals so long as you have not toggled off that notification type within Notification Preferences.
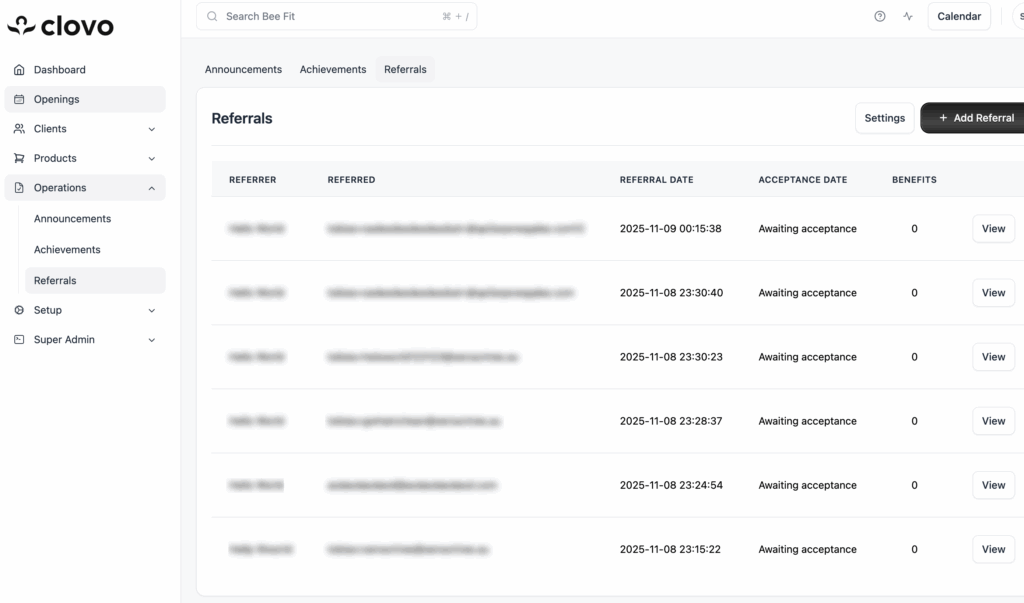
Referrals are also visible under Operations > Referrals. Which will show the history of all referrals ever made by your clients, including whether the referral was accepted, and which benefits have been applied.
Change what notifications I receive about Referrals
We take notifications seriously in Clovo and allow you to tune as far in or out of notifications as your role in your studio allows. You can customise what notifications you as a studio owner or studio staff member receive about referrals. We recommend at least one staff in your studio keep these notifications enabled.
All notifications are enabled by default.
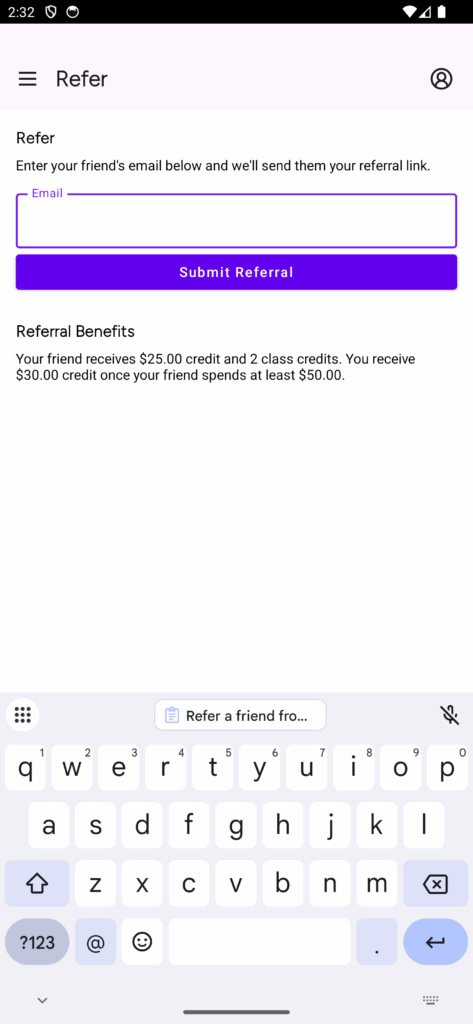
How your clients can refer their friends
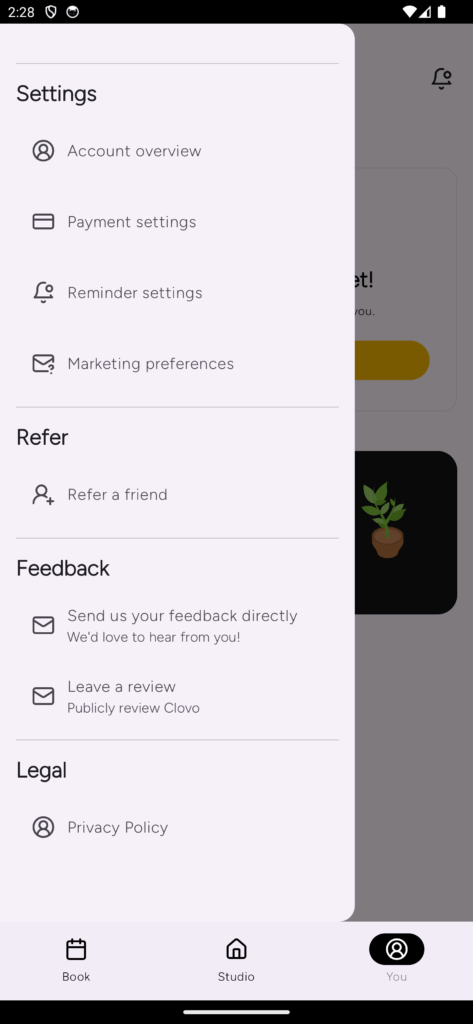
Your clients can easily refer their friends from the client app by tapping on the Account Menu from the ‘You’ tab (this is the 3 dots on iOS or the Person icon in Android).
Your clients only need to enter their friends email address and tap refer. We’ll take it from there.
Note that the refer a friend button and user interface does not show for studios who have their referral program toggled off.
Refer a friend from the Account Menu on iOS
Refer a friend screen on iOS
Refer a friend from the Account Menu on Android
Refer a friend screen on Android
How is monetary credit added to an account
When you choose to reward your referred client or the referring client with monetary credit, it is applied to their Stripe account in the form of a credit balance which is then automatically applied to their next membership purchase or renewal.
Existing (Referring) Clients
For existing clients, their next purchase will likely be the renewal of an existing membership. In this case, the credit will be applied and their next renewal will only be for any outstanding amount exceeding the bonus credit.
New (Referred) Clients
For new clients, this amount will be deducted from their first purchase. The discounted amount will be displayed on the payment screen as the client is completing their purchase.
Credit Balance vs. Cash Balance
If you choose to reward your referring or referred clients with a monetary credit, it’s important to note that the amount is credited to the client’s Stripe account as a ‘Credit Balance’. You do not need to pay this money in, but the money can be spent like cash with your studio on memberships and renewals. Note that as it is a Credit Balance and not a Cash Balance, the client cannot cash out their monetary reward. However if you were to refund the credit, it would then convert to a cash balance and could be withdrawn by the client. Credit balances only apply to membership purchases and renewals.
How packs are added to an account
If you choose to reward your new client with a credit pack for signing up, it will be added to their account instantly upon sign-up. They will not have to add the pack manually. Your new client will be able to use the pack to book immediately.
Minimum Spend
If you set a minimum spend amount on your referral program it means that the referring client will only get their benefits applied once their referral spends that amount with your studio. This is a once off hurdle, with benefits being applied only once following the minimum spend.