The Churn Rate report helps you understand how many recurring members have left recently. It is a quick retention pulse for your studio.
Where To Find It
Open Reporting, then select Churn Rate.
Why This Report Matters
Recurring members are usually the foundation of a stable studio. Churn shows how much of that base is leaving, so you can spot retention problems before they become a revenue problem.
A low churn rate usually means your recurring members are staying engaged. A rising churn rate can point to friction in the member experience, schedule fit, pricing, seasonality, or a change in how people are using the studio.
How To Read It
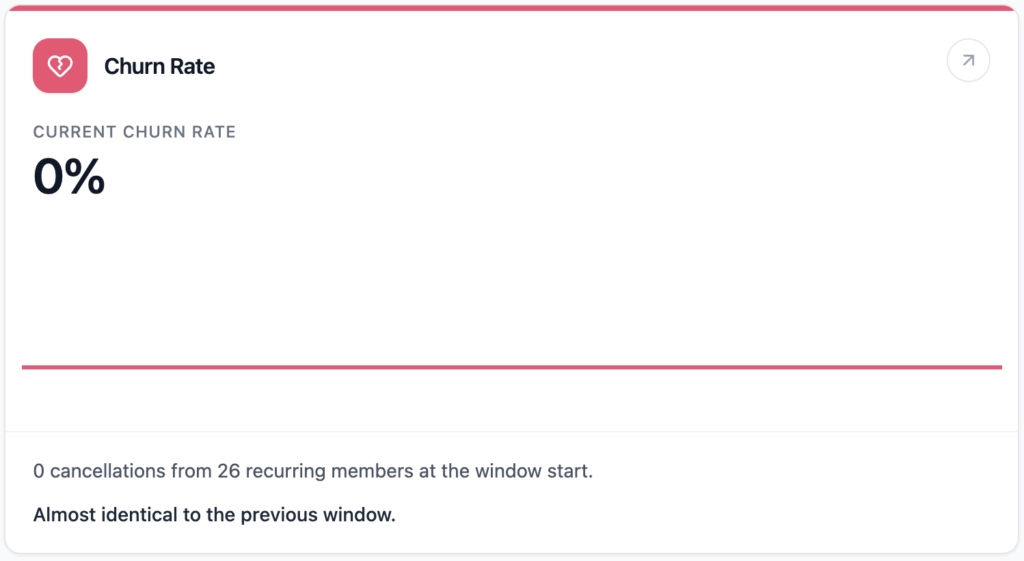
Current churn rate is the percentage of recurring members who cancelled during the current 30-day window.
Cancelled memberships shows how many recurring memberships ended in that window.
Members at window start shows the recurring member base used as the starting population.
Retention rate shows the share of that starting base that stayed.
Biggest wobble day highlights the day with the most cancellations in the current window.
What The Number Means
Lower churn is generally healthier because more members are staying on board. If churn moves up, look for patterns around cancellation timing, recent timetable changes, studio closures, billing changes, or membership pauses.
One high-churn window does not always mean there is a long-term problem. Compare it with Monthly Recurring Revenue and Cohort Retention to see whether the cancellations are affecting the wider member base.
How Clovo Calculates It
Clovo counts recurring, non-trial memberships cancelled during the past 30 days, then compares that with the recurring member base that was active at the start of the same window.
The report compares the current 30 days with the previous 30 days. Deleted, purge
The Cancellations & No-Shows report shows where booked demand is being lost before or during class.
Where To Find It
Open Reporting, then select Cancellations & No-Shows.
Why This Report Matters
Every cancellation or no-show can affect room energy, waitlist movement, revenue potential, and the experience for customers who wanted a spot. This report helps you see whether attendance loss is isolated or becoming a pattern.
It is especially useful when classes look busy on the timetable but the room feels quieter than expected.
How To Read It
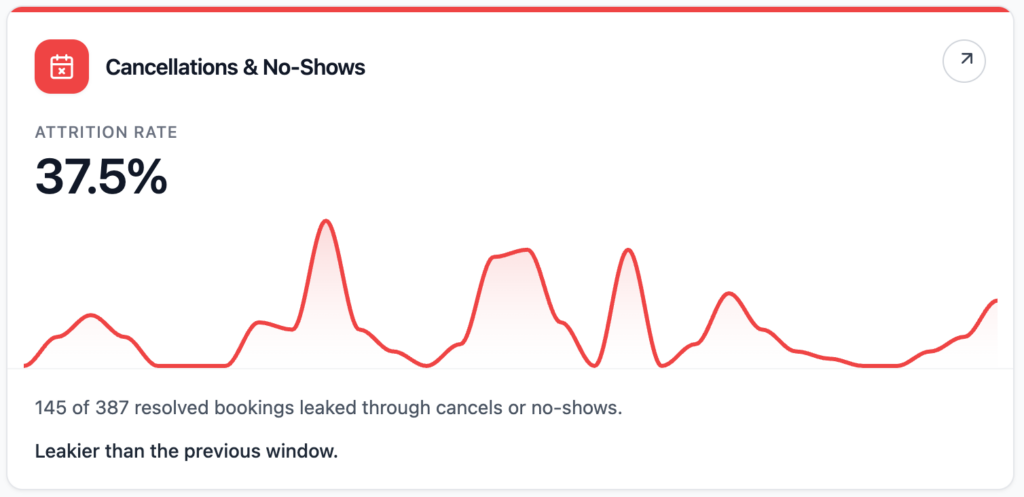
Attrition rate shows the share of resolved bookings that became cancellations or no-shows.
Cancellations shows bookings cancelled in the window.
No-shows shows bookings that stayed active but did not receive a check-in.
Resolved bookings shows bookings that have either been cancelled or belong to classes that have already happened.
Late cancels are cancellations made within 24 hours of class start.
Early cancels are cancellations made with more notice.
Leakiest classes shows classes where the highest share of spots slipped away.
What The Number Means
A lower attrition rate means more booked demand is holding through to class. A higher rate means more bookings are being lost through cancellations or no-shows.
Late cancels and no-shows are often the most important to review because they are harder to recover. If those numbers rise, consider reminder timing, waitlist settings, cancellation policies, timetable fit, and whether certain classes or times are creating more attendance friction.
How Clovo Calculates It
Clovo looks at customer bookings for scheduled classes in the past 30 days that have already resolved. A booking is counted as lost if it was cancelled or if the class has passed and the booking has no check-in.
Late cancels are cancellations made within 24 hours of the class start. The report compares the current attrition rate with the previous 30 days.
The Avg Visits per Customer report shows how often active customers are booking and attending classes across the past 30 days.
Where To Find It
Open Reporting, then select Avg Visits per Customer.
Why This Report Matters
Attendance habits are one of the clearest signals of engagement. Customers who visit regularly are more likely to build a routine, keep using their purchases, and stay connected to the studio.
This report helps you see whether customers are simply booking occasionally or building a consistent practice.
How To Read It
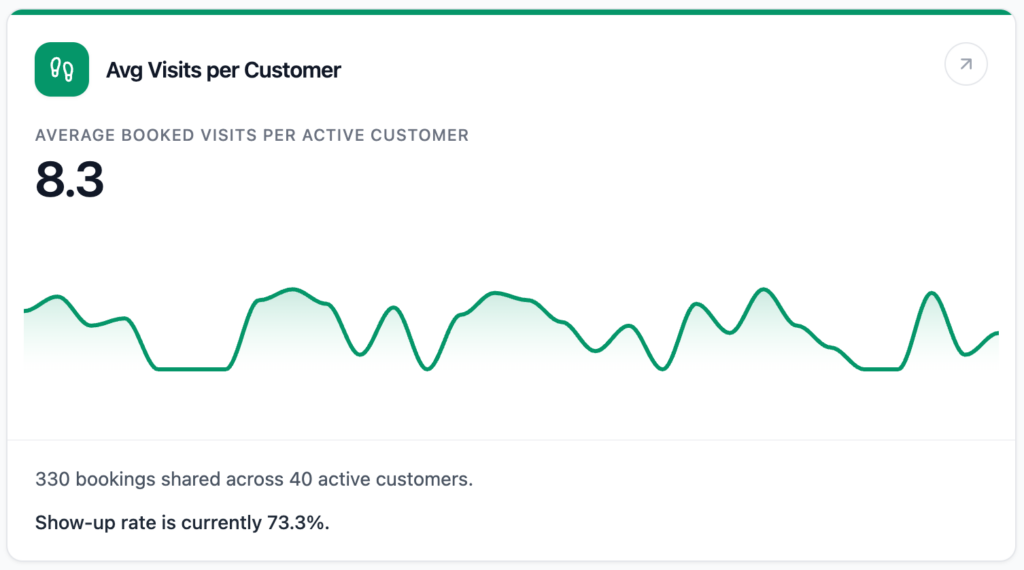
Average booked visits per active customer is the average number of booked visits per customer in the window.
Booked visits shows total non-cancelled customer bookings counted.
Checked-in visits shows how many of those bookings turned into check-ins.
Active customers shows the number of customers included in the average.
Show-up rate shows the share of bookings that became check-ins.
Busiest bookings day highlights the day with the most booking activity.
What The Number Means
A higher average usually means stronger engagement. A lower average can suggest customers are not building a regular habit, or that the timetable is not matching demand.
Watch the show-up rate as well as the booking average. High bookings with low check-ins may point to attendance friction, reminder issues, late cancellations, or no-shows.
How Clovo Calculates It
Clovo counts customer bookings from scheduled classes that were not cancelled in the past 30 days, then divides those bookings by the number of unique active customers.
The secondary check-in read shows how many of those bookings became recorded arrivals.
The Avg Spend per Customer report shows how much each paying customer has spent on average during the past 30 days.
Where To Find It
Open Reporting, then select Avg Spend per Customer.
Why This Report Matters
This report gives you a simple monthly read on customer value. It helps you understand whether revenue is being driven by more paying customers, larger purchases, or both.
Use it when you are reviewing pricing, promotions, membership uptake, or the impact of a new product or offer.
How To Read It
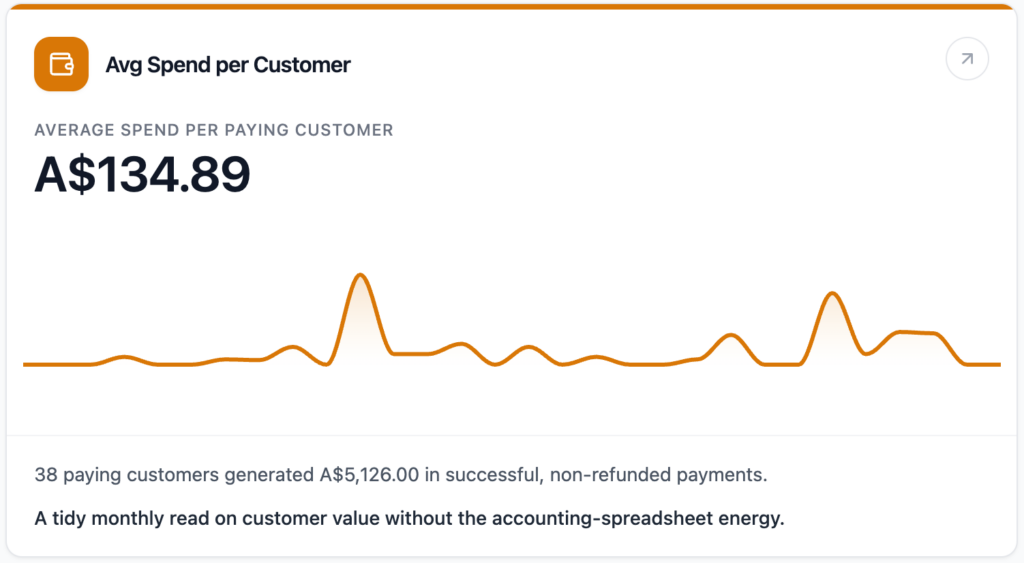
Average spend per paying customer is the headline number.
Paying customers shows how many unique customers made successful payments in the window.
Successful payments shows the number of successful payment records counted.
Total captured revenue shows the revenue included in the average.
Average transaction helps show whether the month is being lifted by transaction size or customer count.
Busiest revenue day highlights the strongest payment day in the window.
What The Number Means
A higher average can mean customers are buying higher-value products, purchasing more often, or renewing larger memberships. A lower average can happen when more new customers are buying lower-cost intro products, or when total revenue has softened.
Read this report beside New Customer Acquisition and Customer Lifetime Value. Acquisition tells you whether new customers are arriving, while lifetime value shows how customer value is building over the whole relationship.
How Clovo Calculates It
Clovo totals successful, paid, non-refunded customer payments created during the past 30 days, then divides that total by the number of unique paying customers.
The report compares the current 30-day average with the previous 30-day average. Deleted, purged, and non-customer accounts are excluded.
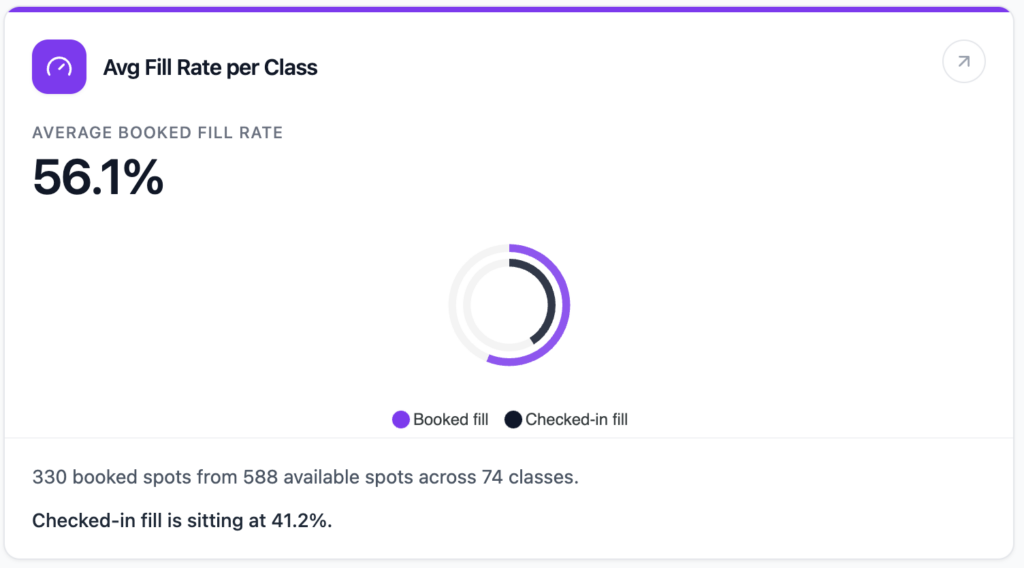
The Avg Fill Rate per Class report shows how efficiently your available class spots are being used.
Where To Find It
Open Reporting, then select Avg Fill Rate per Class.
Why This Report Matters
Fill rate helps you understand schedule performance. It shows whether classes are attracting enough bookings for the capacity available, and whether booked demand is converting into actual attendance.
This report is useful when you are deciding whether to add classes, reduce classes, change class times, move classes to different rooms, or promote underused sessions.
How To Read It
Average booked fill rate is the percentage of available spots that were booked.
Checked-in fill shows the percentage of available spots that were actually attended.
Classes counted shows how many scheduled classes were included.
Booked spots shows the total number of spots reserved.
Top filled classes shows which classes used their available spots best.
What The Number Means
A high booked fill rate means demand is strong for the capacity on offer. A lower booked fill rate may mean the class needs promotion, a better time slot, a different room size, or a timetable review.
If booked fill is high but checked-in fill is lower, customers are reserving spots but not always arriving. In that case, compare this report with Cancellations & No-Shows.
How Clovo Calculates It
Clovo looks at scheduled classes that were not cancelled in the past 30 days. It divides booked spots by available spots to calculate booked fill, then divides checked-in spots by available spots to calculate checked-in fill.
Complimentary bookings are included because they still take a spot in the room.
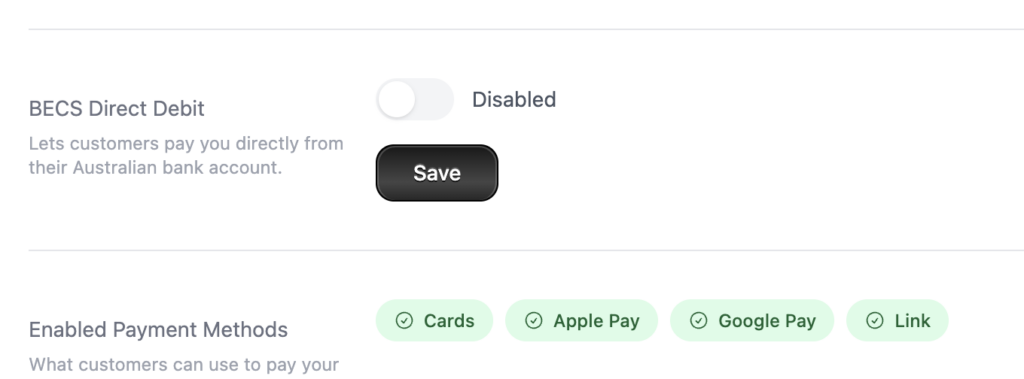
If you do not want customers to pay by direct debit, you can turn off the BECS Direct Debit switch in Setup > Settings > Stripe. Once saved, direct debit will no longer be offered as a payment option at checkout for your studio.
Who Can Change This Setting
This setting is available to studio users with Owner or Finance access.
Your Stripe onboarding must also be fully completed before the direct debit switch can be changed.
How To Disable Direct Debit
Go to Setup.
Open Settings.
Select Stripe.
Find the BECS Direct Debit setting.
Turn the switch off so it shows Disabled.
Click Save.
What Happens Next
After you save:
you should see a confirmation message that BECS Direct Debit disabled
the switch should remain in the Disabled position
BECS Direct Debit should no longer appear in the Enabled Payment Methods list on the same page
If You Cannot See Or Change The Switch
Check the following:
Stripe onboarding is complete
you have Owner or Finance access
Stripe payment methods are loading normally
If Stripe has not finished onboarding, complete that first and then return to Setup > Settings > Stripe.
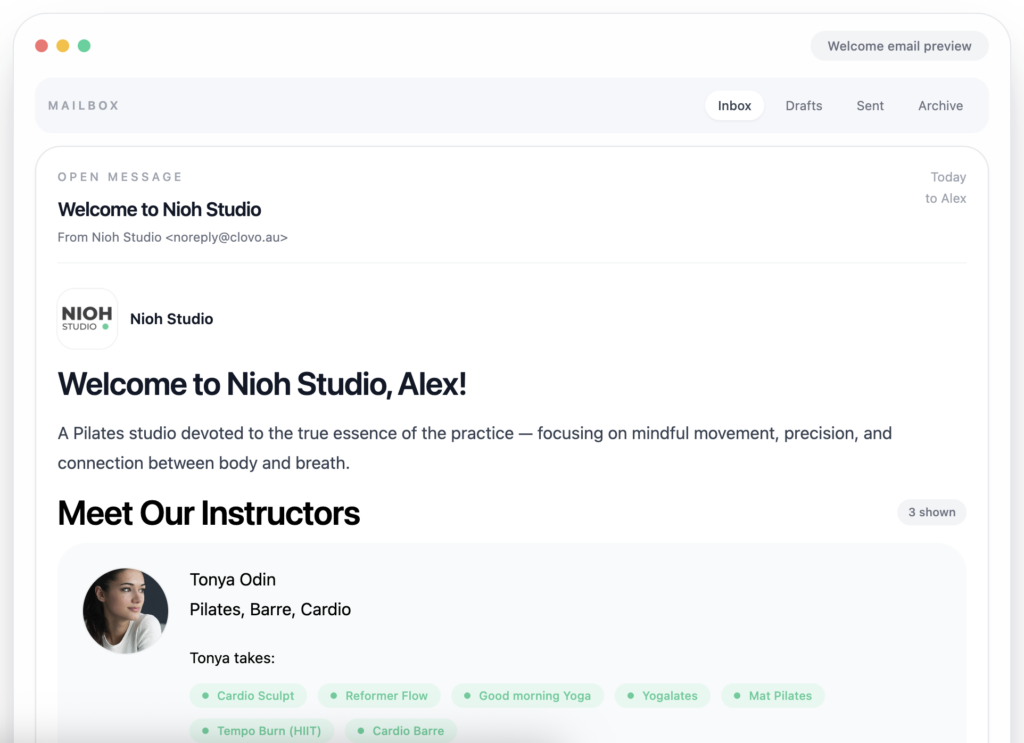
You can now customise the welcome email your studio sends to new clients when they join.
This lets you add your own welcome message, choose which offers and details appear in the email, and control the order they are shown in. A live preview on the right updates as you make changes, so you can see how the email will look before you save.
What you can customise
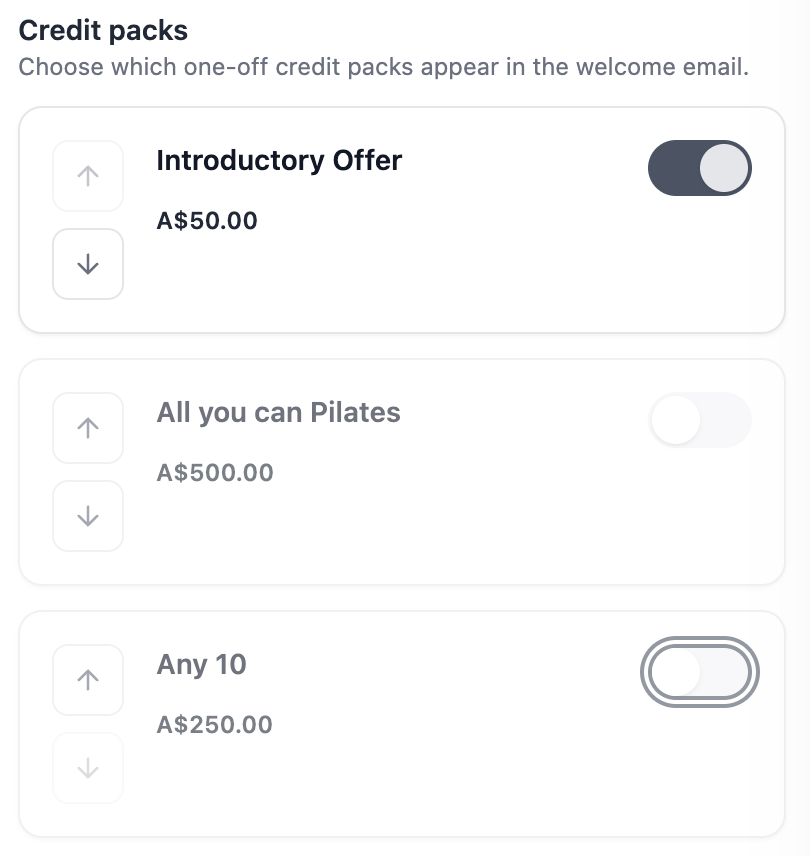
In the Welcome email settings, you can:
Add a custom welcome message at the top of the email
Keep your formatting in that message, including line breaks and spacing
Choose whether to show or hide:
Membership plans
Packs
Trials
Instructors or trainers
Locations
Change the order these sections appear in the email
Send yourself a test email to check the result
If you don’t want to customise your welcome email Clovo will choose safe defaults out of the box.
How to update your welcome email
In the dashboard, go to Settings.
Open Welcome email.
Add or edit your custom message.
Use the controls on each item to:
Show or hide it
Move it up or down
Check the live preview on the right as you make changes.
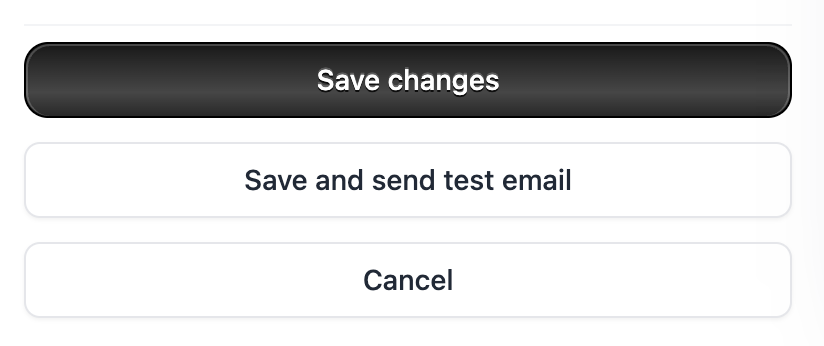
Click Save changes to save your settings.
If you would like to send yourself a copy at the same time, click Save and send test email instead. The test email is sent to the email address of the user who is currently logged in.
How the preview works
The preview updates live as you type or reorder items, so you can quickly see the effect of your changes.
The preview is designed to closely match the real welcome email, including your branding, section headings, colours, and content. However, the final layout can still vary slightly between email clients such as Gmail, Apple Mail, and Outlook.
What new clients will see
The welcome email can include:
Your studio branding
Your custom welcome message, or your studio description if no custom message has been added
Membership plans
Packs
Trials
Instructors or trainers
Locations
Only the items you have chosen to show will appear, and they will appear in the order you set.
Good to know
Your changes apply to future welcome emails.
Existing studios will keep the default setup until these settings are updated and saved.
By default, all available sections are included until you choose otherwise.
Tips
Use the custom message to give new clients a warm introduction and explain what to do next.
Keep the email focused by hiding offers or locations that are not relevant to new joiners.
Send yourself a test email before making the changes live, especially if you have updated the order or hidden certain sections.
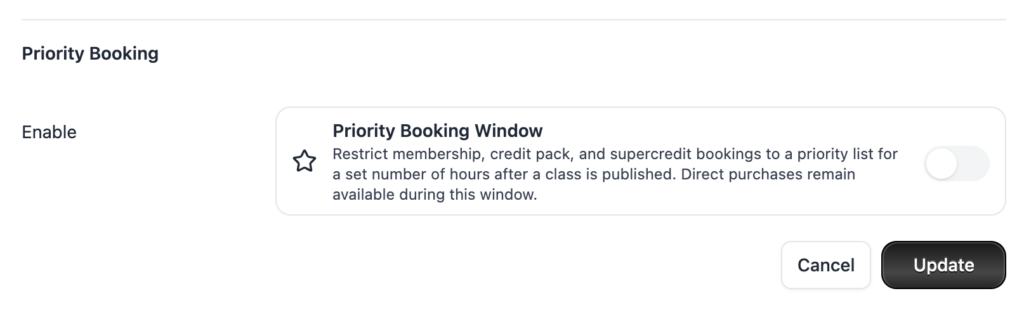
If you run popular classes that fill up fast, you know the drill — spots are gone in seconds and your most loyal members miss out. Priority Booking gives your best clients a head start by reserving a booking window just for them before the class opens up to everyone else.
You choose which clients get priority, how long the window lasts, and which schedules it applies to. It’s a great way to reward loyalty and keep your regulars coming back.
How it works
When a class opening is created for a schedule with priority booking enabled, a priority window kicks in. During that window, only clients on your priority list can book. Once the window expires, the class opens up to all clients as normal.
The priority window starts when the opening is created — so if you’ve set up a class release time, the window begins at that release time rather than in the middle of the night. We’d recommend pairing priority booking with a class release time so your priority clients get the most out of their head start.
Who gets priority?
You have three ways to define your priority list, and you can mix and match:
Individual clients — hand-pick specific clients who should get early access
Membership plans — any client with an active membership on a selected plan gets priority
Client tags — any client with a selected tag gets priority
A client only needs to match one of these to be on the priority list. For example, if you select a “VIP” tag and an “Unlimited” membership plan, any client who has either the tag or an active membership on that plan will get priority access.
Setting up Priority Booking
Priority booking is configured per schedule, so you can offer it on your high-demand classes without affecting the rest.
When creating a new schedule
1. In Clovo Studio, go to Setup > Schedule.
2. Click Add schedule.
3. Fill in the class, day, time, and other details as usual.
4. In the Priority Booking section, toggle Enable Priority Booking on.
5. Set the Priority window (hours) — this is how long the priority-only period lasts, from 1 to 168 hours (7 days).
6. Select your priority Clients, Plans, and/or Tags.
7. Save the schedule.
On an existing schedule
1. Go to Setup > Schedule and click on the schedule you’d like to update.
2. Click Edit.
3. Toggle Enable Priority Booking on and configure the window and priority list.
4. Save your changes.
Changes to the priority list or window duration only apply to future openings. Any classes that have already been opened keep their original priority window timing.
What your clients see
During the priority window, clients who aren’t on the priority list won’t be able to book the class. They’ll see that the class is in a priority booking window and when the window ends, so they know exactly when they can jump in.
Once the window expires, the class opens up and anyone can book as normal — first in, best dressed.
Pairing with Class Release Time
Priority booking works best when paired with a class release time. Without a release time, openings are created whenever our scheduler runs (every 30 minutes), which could be at any hour. The priority window starts from that moment, which might mean it’s ticking away overnight when nobody’s booking.
By setting a release time (e.g. 7:00am), you ensure the priority window starts when your clients are actually online and ready to book.
To set a class release time, head to Setup > Account and scroll to the Schedule settings section.
FAQs
Can I have different priority windows for different classes?
Yes. Priority booking is set per schedule, so you can have a 24-hour window on your Saturday morning Pilates and a 4-hour window on your Tuesday evening class — or no priority booking at all on others.
What happens if I don’t select any priority clients, plans, or tags?
If you enable priority booking but don’t add anyone to the priority list, nobody will be able to book during the window. Make sure you’ve selected at least some clients, plans, or tags.
Do one-off purchases bypass the priority window?
Yes. If a client is purchasing a class directly (a one-off payment rather than using a membership or credit pack), the priority window is bypassed. This means you won’t miss out on revenue from walk-in or casual clients during the priority period.
Can staff still book clients during the priority window?
Yes. When you book a client into a class from the dashboard, the priority window is bypassed. This gives you the flexibility to manage bookings manually when needed.
I edited my schedule’s priority settings — why didn’t existing classes change?
By design, existing openings keep their original priority window. This avoids changing the rules on clients who may have already seen or planned around the original timing. Your changes will apply to all future openings generated from that schedule.
Does priority booking work with waitlists?
Yes. Priority booking and waitlists are independent features that can both be active on the same class. The priority window controls who can book during the initial window, while the waitlist manages what happens when a class is full.
When you add classes to your schedule, Clovo automatically generates openings for your clients to book into. By default, those openings appear the moment our scheduler runs — which might be the middle of the night or some other time that doesn’t suit your studio.
Class Release Time lets you choose a specific time of day when new openings are released to your clients. This means everyone gets a fair shot at booking, and you get to decide when that window opens.
This works hand-in-hand with the Schedule Days Ahead setting, which controls how far into the future your openings are generated.
How it works
Our scheduler runs every 30 minutes in the background, generating openings based on your schedule. Without a release time set, new openings appear whenever the scheduler happens to run.
When you set a release time, the scheduler holds off on releasing the next day’s batch of openings until your chosen time. So if you’ve set your release time to 7:00am, your clients won’t see new openings appear until after 7:00am each day in your studio’s local timezone.
This is particularly useful if you offer priority booking — it means the priority window starts at a time when your members are actually awake and ready to book, rather than burning through overnight.
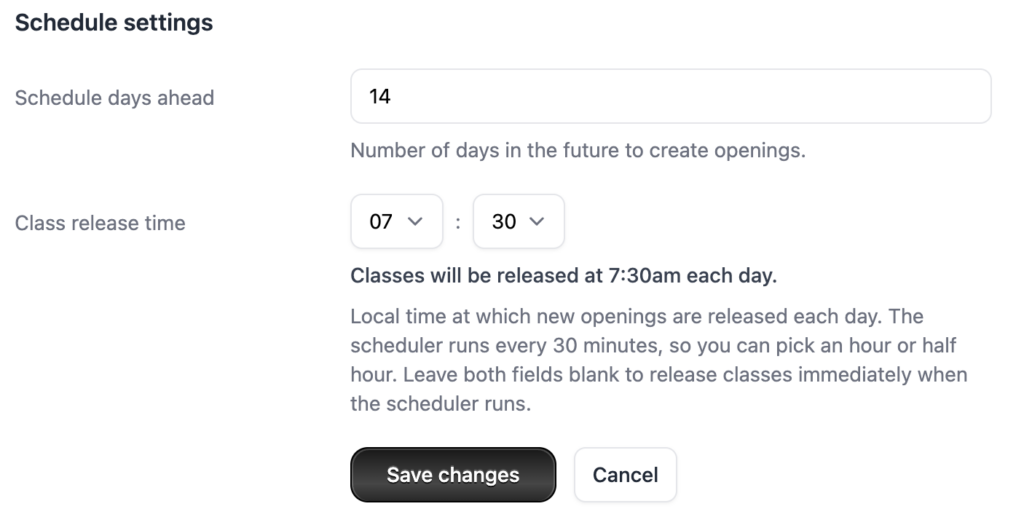
Setting up Class Release Time
1. In Clovo Studio, go to Setup > Account.
2. Scroll down to the Schedule settings section.
3. Under Class release time, select an hour and minute from the dropdown menus.
4. Click Save schedule settings.
You can only choose times on the hour or half hour (e.g. 7:00am, 7:30am, 8:00am). This matches the frequency our scheduler runs, so there’s no misleading lag between the time you pick and when classes actually appear.
A live preview will show you exactly when classes will be released based on your selection.
Changing Schedule Days Ahead
While you’re in the schedule settings, you can also adjust how many days into the future your openings are generated.
1. In the Schedule settings section, find Schedule days ahead.
2. Enter a number between 1 and 30.
3. Click Save schedule settings.
The default is 14 days. If you set this to 7, your clients will only ever see the next week of classes. Set it to 30 and they’ll be able to book up to a month out.
Clearing the release time
If you’d like to go back to the default behaviour where classes are released as soon as the scheduler runs, simply clear both the hour and minute dropdowns so they’re blank, then save.
FAQs
Does changing the release time affect classes that are already open?
No. Any openings that have already been generated and are visible to your clients stay as they are. The release time only affects when new openings appear going forward.
What happens if I don’t set a release time?
Classes are released as soon as the scheduler runs, which happens every 30 minutes. This is how Clovo works out of the box — you only need to set a release time if you want more control over when new openings appear.
Does the release time use my studio’s timezone?
Yes. The time you set is based on the timezone configured for your studio in your business address settings.
I changed my schedule days ahead — why don’t I see more classes yet?
The scheduler runs every 30 minutes, so it may take up to 30 minutes for new openings to appear after you change this setting. If you’ve also set a release time, the new openings won’t appear until after that time.
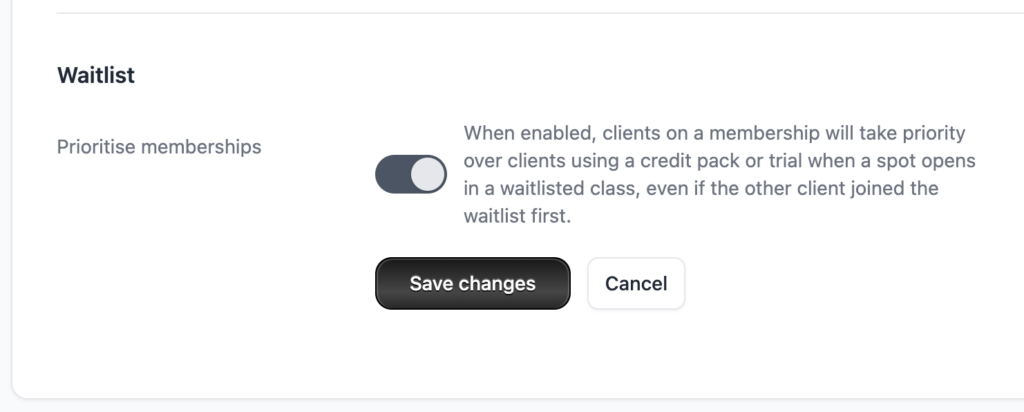
Your most loyal clients — the ones who’ve committed to a membership — can now be given first dibs when a spot opens up on the waitlist over credit pack and trial clients.
What is Membership Waitlist Priority?
When a spot opens in a waitlisted class, Clovo normally fills it on a first-come, first-served basis. That’s fair enough, but it means a client who bought a casual credit pack five minutes ago gets treated the same as the member who’s been training with you every week for two years.
Membership Waitlist Priority changes that. When enabled, clients on a membership automatically jump ahead of clients using a credit pack or trial — even if the credit pack client joined the waitlist first.
Members still compete with other members on a first-come, first-served basis, and credit pack and trial clients still compete with each other the same way. The only change is that members get processed first when a spot opens up.
Why it matters
Memberships are the backbone of your revenue. Rewarding that commitment with a better waitlist experience is a small thing that sends a big signal — “we value you being here.”
It also gives fence-sitters one more reason to lock in a membership instead of rolling with casual packs. It’s great marketing for your memberships.
How to turn it on
Head to Settings in your dashboard
Scroll down to the Waitlist section
Toggle on Prioritise memberships
Hit Save
That’s it. The setting takes effect immediately for all future waitlist processing.
How it works in more detail
Say you’ve got a full class with three people on the waitlist:
Position
Client
Plan type
Joined waitlist
1st
Sarah
Credit pack
9:00 AM
2nd
James
Membership
9:05 AM
3rd
Mia
Trial
9:10 AM
Without priority enabled, Sarah gets the spot — she joined first.
With priority enabled, James gets the spot. He’s the only member on the waitlist, so he moves to the front regardless of join time. If another spot opens, Sarah gets it next (credit pack clients are still ordered by join time among themselves).
Good to know
Only kicks in when there’s competition. If the class has space, everyone books in normally — no waitlist, no priority needed.
Members vs members stays fair. Two members on the same waitlist are still ordered by who joined first. Priority only comes into play between membership clients and credit pack or trial clients.
Trials are treated like credit packs. Both are deprioritised equally when the setting is on.
Frequently asked questions
Will my clients know they’ve been bumped? No. The waitlist experience from the client’s perspective doesn’t change — they still get notified when they get a spot. There’s no visible indicator of priority ordering.
Can I turn it off again? Yep, just flip the toggle back. It takes effect straight away and your waitlists go back to pure first-come, first-served.
Does this affect clients already on a waitlist? Yes. Priority is applied at the time a spot becomes available, not when the client joins the waitlist. So if you enable it while people are already waitlisted, the new ordering applies next time a spot opens.