
Connect Stripe and check your payment settings

Tobias Gundry
Updated
Clovo never holds your money. Every card and bank payment your studio takes runs through your own Stripe account, and Stripe pays out to your bank. This distinction helps you know whether to look in Clovo or Stripe when a payment question comes up.
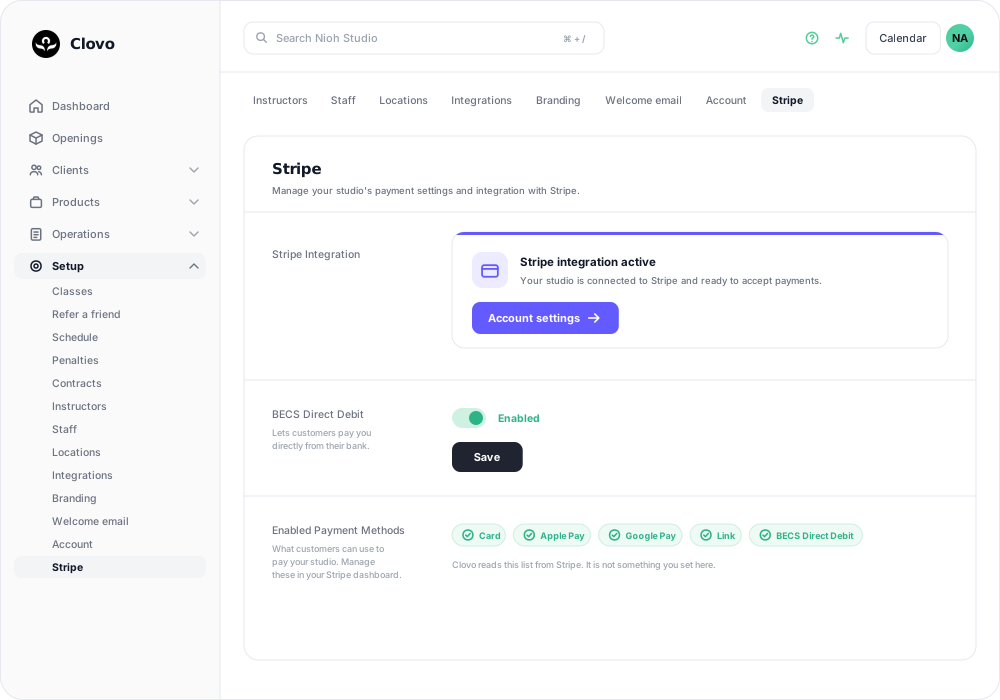
Where to look
Go to Setup → Payments. It includes your Stripe connection, Invoices, BECS Direct Debit, and Failed Payments.
The three states you might see
Start accepting payments — no Stripe account is connected yet. Connect with Stripe takes you through creating or linking one. Until this is done, your studio cannot take a payment at all.
Finish setting up Stripe — onboarding began but is not complete. Stripe may still need a document, a bank account, or a business detail. Finish setup returns you to where you stopped. Payments become available after setup is complete.
Stripe integration active — connected and ready. Account settings opens your Stripe account details without leaving Clovo.
Before you can connect Stripe, two requirements apply:
- Your studio must be verified by Clovo. Until it is, the Stripe card is shown greyed out as a preview of what becomes available.
- Your own email address must be verified. If it is not verified, Clovo shows a Resend verification email button.
What you can change here, and what you can't
This distinction shows which settings belong in each place.
In Clovo:
-
Invoice address — choose your business address or a studio location for the From address on new invoices and receipts. See Change the address shown on invoices.
-
Invoice top text and Invoice bottom text — the optional wording shown on every invoice and receipt. These fields are in the Invoices card, along with a read-only summary of the business details printed on those documents.
-
BECS Direct Debit — whether Australian bank-account payments are offered at checkout. See How to disable direct deposit.
-
Wait for the payment to clear — whether a membership or pack bought by bank transfer is issued at checkout or only once the money arrives. It sits under Payment clearance in the BECS Direct Debit card. See Wait for BECS Direct Debit payments to clear.
-
Block membership on a failed payment — whether a membership is held when a renewal payment fails, in the Failed Payments card. See Blocking a membership when a payment fails.
-
Refunds on individual client payments. Open the client's payments and use the payment's actions menu.
In Stripe:
- Enabled Payment Methods — the list in the connection card is read from your Stripe account. Clovo shows you what customers can pay with; it does not decide it. To add Apple Pay, Link, or anything else, change it in your Stripe dashboard and it will appear here.
- Payouts — how often Stripe sends money to your bank, and which bank.
- Disputes and chargebacks.
Payment settings that are not listed in Clovo are managed in Stripe.
Who can change it
Changing the BECS Direct Debit switch needs the Owner or Finance role, a verified email address, and completed Stripe onboarding. If the switch is missing or does not save, check those requirements in this order.
When a payment needs attention
For a payment that needs attention, open its record first:
- A membership renewal that did not clear is in Operations → Failed Payments, with Stripe's own decline reason and the next retry.
- A class booking that failed after a card payment was captured is a different case — see Find out why a booking failed, and refund the captured payment from the client's record before trying again.
- A front-desk sale is on the client's own record; see Take a payment from a client at the front desk.
Use Setup → Payments when your question concerns the connection itself — payments not running, a payment method missing from checkout, or money not arriving in your bank.
Related articles
When will I get my first payout?
Your first Stripe payout may take longer than future payouts. Here is the timing to expect, where to see the date in Clovo, and what to check if it is delayed.
Show your timetable on your studio’s website
Copy an embed code from Clovo Dashboard to place your live class timetable on your own website, with weekly and monthly views your visitors can switch between.
Accessing your Clovo ‘studio code’ needed for certain integrations
The Clovo Studio Code is a short 4-character alphanumeric string that uniquely identifies your studio. It is used when integrating your Clovo instance with external services like your website.
Add Clovo to your WordPress website with the Clovo WordPress Plugin
Add your live schedule and product listings to a WordPress website with the Clovo WordPress Plugin.