
Author: user

Deleting a client from your studio

No matter how well you run your studio and how much your clients love what you do for them, the day will come when they move on and you will want to remove them from Clovo so they no longer receive notifications or reminders.

Clovo makes this easy to handle in a way that is safe and easy to understand.

Staff Initiated Deletion

To delete a client as a Studio Owner:

  1. Login to Clovo studio
  2. Find the client you want to delete using the search bar or by browsing for them on the ‘Clients’ screen
  3. You will see a section called ‘The Danger Zone’ – under this heading, there’s a delete button to remove your client.

At this point your client will be moved to the ‘Archived’ section. They can no longer login or use their memberships but are still saved in the system for an additional 7 days that serves as a grace period for accidental deletions or change of mind. Following the 7 days the client will be automatically deleted from the Clovo system entirely and permanently.

Client Initiated Deletion

So long as we give your client an opportunity to create an account, we must also offer them an opportunity to delete their account. Clients are able to initiate the deletion process themselves from their client app.

Much like a staff initiated deletion, the client will be moved to ‘Archived’ and will no longer be able to use their account upon requesting their account be deleted. These deletions are subject to the same 7 day grace period as staff initiated deletions as well.

Delete Instantly

If your client has not made any purchases they may be eligible for instant deletion. The ‘Instant Delete’ option will show in the heading of the user’s profile under the ‘Archived Clients’ tab on the Users screen when eligible.

If you’re sure this client no longer requires their account, click ‘Instant Delete’ to skip the remainder of the grace period and instantly delete the client from the system permanently.

Requirements for deletion

  • Clients must not have active memberships
  • Clients must not have active bookings

Ensure clients remember their class with booking reminders

There is nothing to do to enable booking reminders as a studio owner, booking reminders are on by default for your clients and your clients are empowered to disable and reenable to suit their preference from within the Clovo client apps.

Clovo ensures users are aware of their upcoming bookings in multiple ways.

In-App Reminders

Following a booking, any time the Clovo app is opened by a user on their device, they will receive a prominent reminder of their upcoming bookings. For iOS users, this reminder takes the form of a sheet that displays all current bookings. For Android users, a Snackbar shows with the number of upcoming bookings.

Calendars and Reminders

Your clients are prompted to add their booking to their device’s reminder or calendar app immediately following a booking on both iOS and Android platforms.

This is a favourite of many users as it allows them to add their classes in with the rest of their schedule and customise their reminder notifications to their ideal settings.

Push Notifications and Emails

Providing your client’s notification settings allow, we will also send your clients push notifications and emails reminding them of their upcoming bookings.

Between the hours of 6.00pm and 9.00pm for any booking occurring the next day, Clovo will attempt to send booking reminder push notifications and emails in accordance with the user’s chosen notification preferences.

For example, if Alice has a reformer pilates class booked in at 7.00am on Tuesday, Clovo will attempt to deliver a booking reminder sometime shortly after 6.00pm on Monday, the day before the booking. We will continue to attempt delivery until a maximum of 9.00pm.

Add your memberships and packs to your marketing website

Showcasing your products and services directly on your website makes it easier for clients to browse and purchase. Follow these simple steps to integrate your offerings using an iframe.

What You’ll Need:

  1. Access to your website’s content editor or HTML files.
  2. Your unique integration code (provided by Clovo Studio).

Step-by-Step Instructions:

  1. Locate the Product & Service Integration Code
    Use the following iframe code as a template for embedding your offerings:

    <iframe frameborder="0" src="https://studio.clovo.au/iframe/plans/studio/e7e7" width="100%" height="2000"></iframe>

  2. Replace the Placeholder Code (e7e7)
    Replace e7e7 in the iframe’s src URL with your unique integration code. For example, if your integration code is XYZ789, the iframe code would look like this:

    <iframe frameborder="0" src="https://studio.clovo.au/iframe/plans/studio/XYZ789" width="100%" height="2000"></iframe>

  3. Add the Code to Your Website
    • If you’re using a content management system (CMS) like WordPress:
      • Open the page or section where you want the product and service listing to appear.
      • Switch to the “HTML” or “Code” view in your editor.
      • Paste the modified iframe code into the desired location.
    • If you’re directly editing the website’s HTML files:
      • Open the file in a text editor.
      • Paste the iframe code where you want the listing to be displayed.
      • Save and upload the updated file.
  4. Test the Integration
    • Visit your website and navigate to the page where the iframe is embedded.
    • Confirm the product and service offerings load correctly and display as intended.
  5. Optional: Adjust the Height (if Needed)
    The height in the iframe code is set to 2000px by default, but you can adjust this value to better fit your website’s layout. For example:

    <iframe frameborder="0" src="https://studio.clovo.au/iframe/plans/studio/XYZ789" width="100%" height="1800"></iframe>

Need Help?

If you encounter any issues or need assistance with your integration code, contact Clovo support. We’re here to help you get your product and service listings up and running on your website.

Embedding your offerings on your website allows clients to easily view and purchase your services, helping you grow your business and keep your clients engaged.

Show your timetable on your studio’s website

Adding your live class timetable to your website is a quick and simple way to ensure new clients can get an idea of your most up-to-date schedule. Follow the steps below to seamlessly integrate your timetable using an iframe.

What You’ll Need:

  1. Access to your website’s content editor or HTML files.
  2. Your unique integration code available in Clovo under Setup > Integrations.

Step-by-Step Instructions:

  1. Locate the Timetable Integration Code
    Use the following iframe code as a template for embedding your timetable:
   <iframe src="https://studio.clovo.au/iframe/timetable/studio/ABCD" width="100%" height="1400" frameborder="0"></iframe>
  1. Replace the Placeholder Code (ABCD)
    Replace ABCD in the iframe’s src URL with your unique integration code. For example, if your integration code is XYZ123, the iframe code would look like this:
<iframe src="https://studio.clovo.au/iframe/timetable/studio/XYZ123" width="100%" height="1400" frameborder="0"></iframe>
  1. Add the Code to Your Website
  • If you’re using a content management system (CMS) like WordPress:
    • Open the page or section where you want the timetable to appear.
    • Switch to the “HTML” or “Code” view in your editor.
    • Paste the modified iframe code into the desired location.
  • If you’re directly editing the website’s HTML files:
    • Open the file in a text editor.
    • Paste the iframe code where you want the timetable to be displayed.
    • Save and upload the updated file.
  1. Test the Integration
  • Visit your website and navigate to the page where the timetable is embedded.
  • Confirm the timetable loads correctly and displays your live schedule.
  1. Optional: Adjust the height if needed
    The height in the iframe code is set to 1400px by default, but you can adjust this value to better fit your website’s layout. For example:
   <iframe src="https://studio.clovo.au/iframe/timetable/studio/XYZ123" width="100%" height="1200" frameborder="0"></iframe>

Are you using WordPress?

Clovo offers a WordPress plugin to make the process of adding your live schedule to your website super simple. Learn more here.

Need Help?

If you encounter any issues or have questions about your integration code, contact Clovo support for assistance. We’re here to ensure your live timetable works seamlessly on your website.

By embedding your timetable, you provide clients with a real-time view of your schedule, making it easier for them to book and stay engaged with your studio.

Deactivate a Credit Pack Plan

Once you’ve created a credit pack in Clovo Studio, you cannot delete it if it has been purchased at any time by any of your clients. However, you can deactivate it so that no new clients can purchase it while existing holders can still use their remaining credits.

When to deactivate a credit pack

You might want to deactivate a credit pack when:

  • You’re replacing it with a new pricing structure
  • A promotional pack has ended and you don’t want new purchases
  • You’re simplifying your product offerings

How to deactivate a credit pack

  1. In Clovo Studio, go to Products.
  2. Find the credit pack you want to deactivate.
  3. Toggle the pack’s active status to off (deactivated).
  4. Save your changes.

What happens after deactivation

  • No new purchases — the pack will no longer be visible to clients in the app or on your landing page
  • Existing holders are unaffected — clients who already purchased the pack can continue using their remaining credits until expiry
  • Reactivation is possible — you can re-enable the pack at any time if you want to offer it again

If you want to restrict a pack to specific clients rather than deactivating it entirely, consider making it a private product instead.

View current subscribers of a membership plan

Keeping track of your membership plan subscribers is essential for managing your studio effectively. Clovo Studio makes it easy to see exactly who is subscribed to any given plan, helping you understand plan popularity and manage your revenue.

How to view subscribers

  1. In Clovo Studio, go to Products.
  2. Find the membership plan you want to check.
  3. Click into the plan details.
  4. The Subscribers section shows all clients currently on this plan.

What you can see

For each subscriber, you can view:

  • Client name — click through to their full profile
  • Subscription status — whether the membership is active, paused, or pending cancellation
  • Billing information — next billing date and payment status

Why this is useful

  • Revenue tracking — quickly see how many active subscribers you have on each plan
  • Plan comparison — identify which plans are most popular and which might need adjusting
  • Client management — easily find and reach out to all clients on a specific plan
  • Churn monitoring — spot paused or cancelling memberships early so you can take action

Cancel upcoming classes that have already been scheduled

Sometimes plans change, and you may need to cancel a scheduled class opening. Clovo puts cancellations on autopilot — notifying all booked clients of the change, making any appropriate refunds or credit adjustments, and updating your timetable automatically.

How to cancel a class opening

  1. In Clovo Studio, go to the Openings page.
  2. Find the class you want to cancel and click on it to open the detail view.
  3. Click the Cancel button (shown with a red X icon).
  4. Confirm the cancellation.

What happens when you cancel

  • Clients are notified — all clients who had booked the class will receive a cancellation notification via email and push notification
  • Credits are restored — if clients used credit pack credits to book, those credits are returned to their pack
  • Timetable is updated — the class is removed from your public timetable and the Clovo app

Cancelling vs. deleting a schedule entry

Cancelling a class opening removes a single instance of a class. It does not affect your underlying schedule, so the class will still appear on future dates. If you need to permanently remove a recurring class, you should edit or delete the schedule entry instead. See Schedules in Clovo for more information.

If your studio is closing temporarily (e.g. for holidays), consider using the Closures feature under Operations rather than cancelling individual classes.

Credit Packs in Clovo

Credit packs let clients book into classes with your studio without committing to a recurring subscription.

Credit packs are prepaid credits for selected classes to be used within a specified period with your studio. Unlike memberships which renew at set intervals, credit packs don’t renew or automatically refill. Which makes them a great option for casual members who may not be able to commit to the regular schedule that memberships cater for.

Packs are also a great way for clients who already have a membership subscription to buy additional services, such as adding private one-on-one classes in addition to their weekly classes membership.

Creating a Credit Pack in Clovo

To create a credit pack in Clovo, from your studio dash at https://studio.clovo.au, expand the ‘Products’ dropdown in the lefthand side navigation menu, click into ‘Packs’, then ‘Add Pack’.

Basic Details

Give your pack a name and description, and set a price including GST if applicable.

Expiry

Set when new purchases of this pack should expire. The expiry is calculated starting from the date of purchase. If needed, you can easily extend the expiry date on a per-client basis following purchase, where needed at your discretion.

You can optionally set a hard expiry date. This gives you an option to expire all credit packs of this type on a given date, rather than a relative number of days from the purchase date. This is a great option for special deals such as opening specials. If you set hard expiry, the pack will also be removed from sale on the expiry date, in addition to all purchases being expired.

Setting inclusions

Credit packs let you sell prepaid credits to clients that can be used to book classes at your studio. Which classes and how many of each is up to you.

To set these inclusions click ‘Add Classes’ on the create or edit screen. Class inclusions are added in groups that let you set how many of each class on that row is included.

For example, if you want to create a pack that gives 10 credits to attend any of your classes, you would create a single group, tick all classes, and set the quantity to 10.

However, if you wanted to also include a private one-on-one reformer session to the pack in addition to the 10 classes, but restricting bookings of that class type to a single class, you would then add an additional group of inclusions, tick only the ‘Private 1:1 Reformer’ class type, and set the quantity to 1.

With this configuration, your pack will now let your client book any 10 of your regular classes, but only 1 private one-on-one reformer class.

Credit Pack FAQs

Credit Pack Expiry

  • Credit packs expire the number of days from the purchase date that you specify or when all credits have been redeemed, whichever comes first.
  • You can extend the expiry date of a purchased credit pack.
  • Hard expiry sets a date that all packs of that type will expire regardless of purchase date. Packs with a hard expiry will also be removed from sale on that date.
  • Clients cannot book for classes past the expiry date of their pack.

Offer recurring memberships by creating a membership plan

Memberships are recurring subscriptions to services from your studio. They’re the ideal product for most studios to sell, depending on your business model, because they ensure a continuous revenue stream in addition to helping to build a community of familiar faces in your studio.

The alternative to memberships are credit packs, where users buy a one-off pack of credits which don’t automatically renew at expiry.

In this article we’ll get real geeky about memberships and the seemingly unlimited ways they can be configured in Clovo to allow you to offer the exact product offering your business needs.

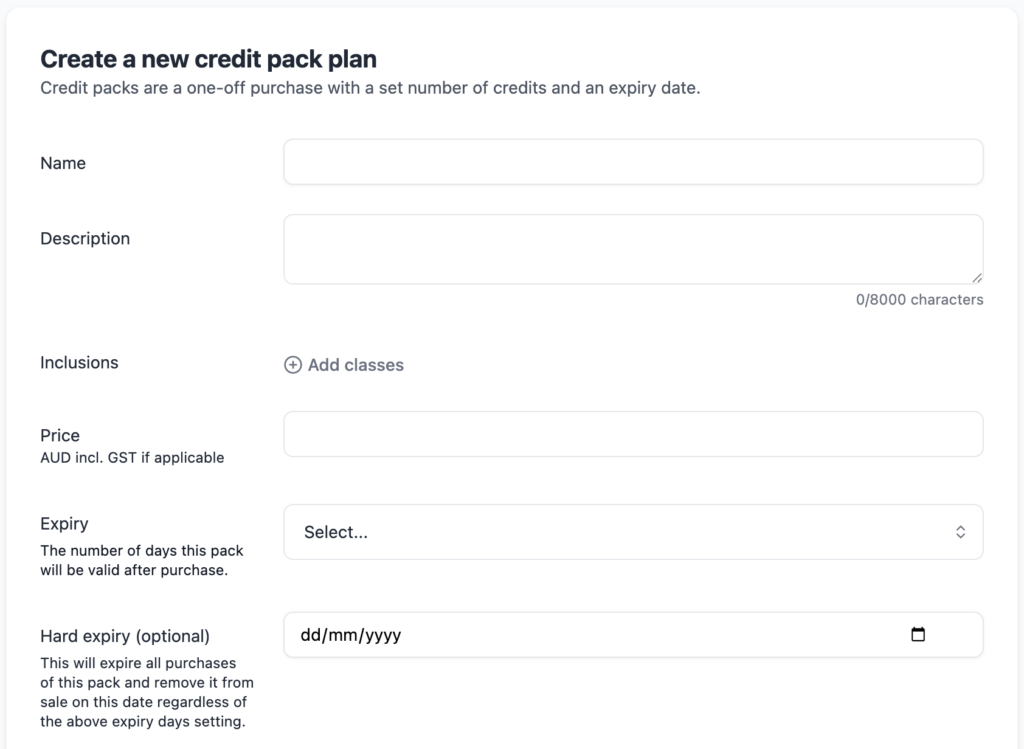
Creating a Membership Plan

While logged into Clovo as an owner or admin:

  1. Go to Products > Plans:
  2. Click Add Plan
  3. Configure your plan:
    • Choose the duration of the billing period (e.g., fortnightly, monthly, quarterly, yearly).
    • Define the number of classes or sessions included in the membership.
  4. Customise Plan Details:
    • Add a description that highlights the features and benefits of the membership.
  5. Create

Benefits of offering Membership Plans

  • Retain Clients: Encourage clients to commit to your studio long-term with membership plans.
  • Increase Revenue: Offer discounts and incentives to attract more clients and boost revenue.
  • Build Community: Create a sense of belonging and community among your members.

How Membership Booking Windows and Allowances Work

If your membership includes a set number of classes, those classes are counted within booking windows. A class uses the allowance for the window it takes place in, not the day you booked it. This means you can book ahead, but each week or fortnight still has its own limit.

How booking windows work

  • Weekly memberships use Monday to Sunday windows.
  • Fortnightly memberships use 2-week windows that run Monday to Sunday across both weeks.
  • And so on for longer membership billing cycles.
  • You can book ahead into future windows.
  • Each class counts toward the window its class date falls in.
  • Unused classes do not move into the next window.

Your first membership period

If you join on a Monday, your membership is already aligned to the normal weekly or fortnightly pattern.

If you join part-way through the week, we do not expect you to use a full allowance in only a few days. Your first allowance is measured from the day you join until your first renewal date. After that, your membership follows the normal Monday-based booking windows.

This is designed to avoid the unfair situation where someone joins mid-week and only gets a few days to use a full allowance.

Example: Weekly membership

You have a weekly membership with 3 classes per week.

You join on Thursday 6 August.

Your first allowance covers the period from Thursday 6 August until your first renewal date. During that first joining period, you can use up to 3 classes. You are not limited to only the remaining few days of that calendar week.

Once your membership moves onto its regular cycle, classes are counted in Monday to Sunday windows.

For example:

  • If you already have 3 classes scheduled in one Monday to Sunday week, you cannot add a 4th class in that same week.
  • If you book a class today for next Tuesday, it uses next week’s allowance, not this week’s.
  • If you have used all 3 classes this week, you can still book classes that fall in the following week, as long as that next week still has allowance available.

Example: Fortnightly membership

You have a fortnightly membership with 6 classes every 2 weeks.

Once your membership is on its regular cycle, one booking window might run from Monday 4 May to Sunday 17 May. The next window would run from Monday 18 May to Sunday 31 May.

How Future Bookings Work on Memberships

If you book classes in a future booking window, those bookings are treated as credit bookings. This means they are held on the assumption that your membership will still be active when that future window arrives.

A credit booking does not mean an extra payment is taken at the time of booking. It simply means the booking is being reserved against a future membership allowance.

What a credit booking means

  • If you book a class in a future week or fortnight, it uses the allowance for the window the class takes place in.
  • That future booking is held in advance based on the expectation that your membership will renew as normal.
  • If your membership remains active, the booking stays in place and counts toward that future window’s allowance.

Example

You have a weekly membership with 3 classes per week.

If you already have classes booked for this week, you can still book a class for next Monday if next week still has allowance available. That booking is treated as a credit booking until that next membership window is reached.

What happens if you cancel your membership

If you cancel your membership, any credit bookings for classes that take place after your membership ends will be cancelled.

This is because those bookings were being held on the assumption that your membership would renew, and once you cancel, that is no longer the case.

What stays booked

Any bookings for classes that take place on or before your paid-through end date will remain booked.

Example

If you cancel on the 15th, but your membership stays active until the 18th because that is the date you have already paid up to:

  • A booking on the 17th stays booked
  • A booking on the 18th stays booked
  • A booking on the 19th or later will be cancelled if it was a credit booking

Why credit bookings are cancelled when a membership is cancelled

Studios often have limited spaces in class. When a membership has been cancelled, any future bookings that rely on a renewal are removed so those places can be made available to other clients.

If you want, I can also turn this into:

  • a shorter in-app help version
  • an FAQ version
  • a combined article that explains both booking windows and credit bookings together

This means:

  • You can book up to 6 classes between 4 May and 17 May.
  • If you already have 6 classes scheduled in that 2-week window, you cannot add a 7th class in the same window.
  • You can still book classes that fall between 18 May and 31 May, because those use the next fortnight’s allowance.

What you can and can’t book

You can:

  • Book ahead into future weeks or fortnights
  • Use the full allowance available in each booking window
  • Book across multiple windows, as long as each window stays within its own allowance

You can’t:

  • Book more classes than your membership includes in a single week or fortnight
  • Use next week’s or next fortnight’s allowance to add extra classes to the current window
  • Carry unused classes into another window unless your studio offers a separate rollover policy

Why a booking may be blocked

The most common reason is that the class falls in a week or fortnight where you have already used the full allowance, even if you made the booking weeks in advance.

How Future Bookings Work on Memberships

If you book classes in a future booking window, those bookings are treated as credit bookings. This means they are held on the assumption that your membership will still be active when that future window arrives.

A credit booking does not mean an extra payment is taken at the time of booking. It simply means the booking is being reserved against a future membership allowance.

What a credit booking means

  • If you book a class in a future week or fortnight, it uses the allowance for the window the class takes place in.
  • That future booking is held in advance based on the expectation that your membership will renew as normal.
  • If your membership remains active, the booking stays in place and counts toward that future window’s allowance.

Example

You have a weekly membership with 3 classes per week.

If you already have classes booked for this week, you can still book a class for next Monday if next week still has allowance available. That booking is treated as a credit booking until that next membership window is reached.

What happens if you cancel your membership

If you cancel your membership, any credit bookings for classes that take place after your membership ends will be cancelled.

This is because those bookings were being held on the assumption that your membership would renew, and once you cancel, that is no longer the case.

What stays booked

Any bookings for classes that take place on or before your paid-through end date will remain booked.

Example

If you cancel on the 15th, but your membership stays active until the 18th because that is the date you have already paid up to:

  • A booking on the 17th stays booked
  • A booking on the 18th stays booked
  • A booking on the 19th or later will be cancelled if it was a credit booking

Why credit bookings are cancelled when a membership is cancelled

Studios often have limited spaces in class. When a membership has been cancelled, any future bookings that rely on a renewal are removed so those places can be made available to other clients.

Showcase your studio’s talent with trainer profiles

Showcase your talented training staff with trainer profiles in Clovo Studio. These profiles not only give clients a glimpse into your team but also enhance their experience by highlighting the professionals behind the classes. Follow these steps to create engaging trainer profiles.

Step-by-Step Guide to Creating a Trainer Profile

  1. Navigate to Trainer Profiles:
    • In the dashboard, expend the ‘Setup’ menu and find ‘Profiles’.
  2. Add a New Trainer Profile:
    • Click on ‘Add Profile’ and enter the trainer’s name, professional title, and upload a profile photo.
  3. Write a Biography:
    • Include a short but informative biography that highlights the trainer’s expertise and personality.
  4. Save the Profile:
    • Once all details are added, click on ‘Save’ to create the trainer profile. The profile will now be published and visible in client apps.

Importance of Trainer Profiles

Trainer profiles serve as a powerful tool to:

  • Showcase talent: Highlight the expertise and skills of your training staff.
  • Build trust: Clients feel more connected and confident when they know the professionals behind the classes.
  • Personalise experience: Match clients with trainers based on their preferences and goals.

Flexibility of Trainer Profiles

It’s important to note that trainer profiles are not connected to user accounts. This allows studios to:

  • Decouple admin staff: Keep trainer profiles separate from admin roles if needed.
  • Maintain flexibility: Easily update and manage trainer profiles without affecting other aspects of the studio management.

By creating engaging trainer profiles, you enhance the overall experience for clients and create a stronger connection between them and your studio.